Presentation of the VMRC console (VMware Remote Console) allowing you to manage your VMs on VMware ESXi 6.7
- VMware
- 23 November 2022 at 16:27 UTC
-

- 2/2

4. Manage your virtual machine settings from VMware Remote Console (VMRC)
Thanks to VMware Remote Console, you will be able to manage the settings of your virtual machine (including its virtual hardware).
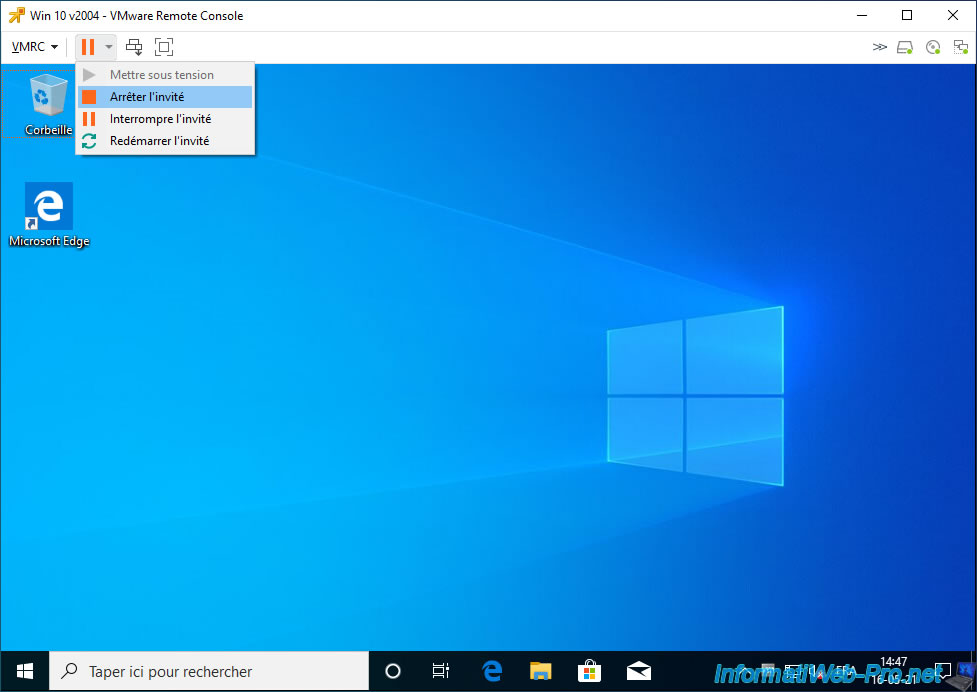
However, for all options to be available, you will need to shut down the virtual machine first.
To do this, click on : Shut Down Guest.
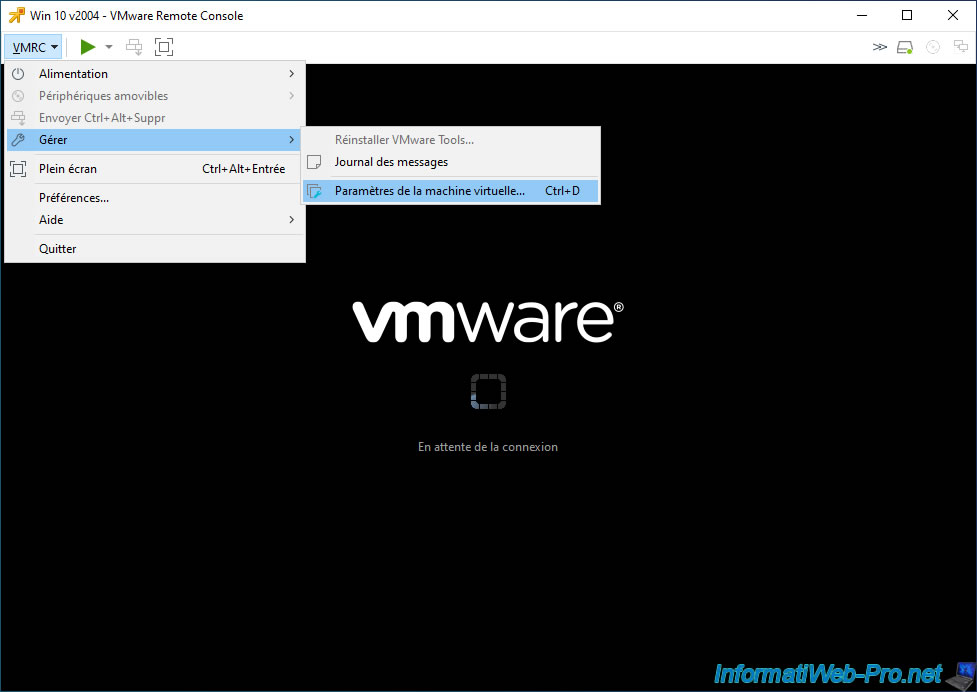
After the guest operating system is shut down, click on : VMRC -> Manage -> Virtual Machine Settings.
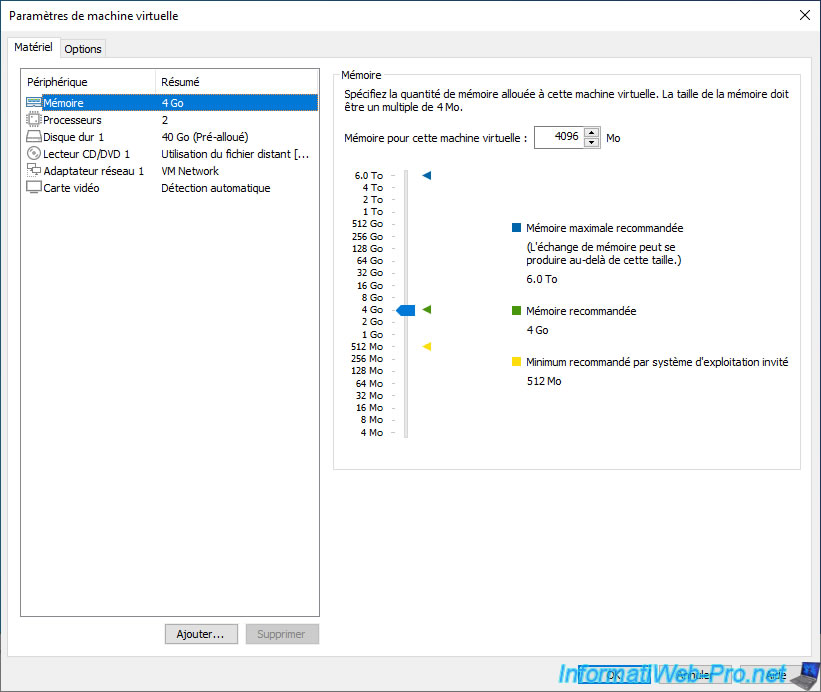
4.1. Manage the virtual hardware of the virtual machine
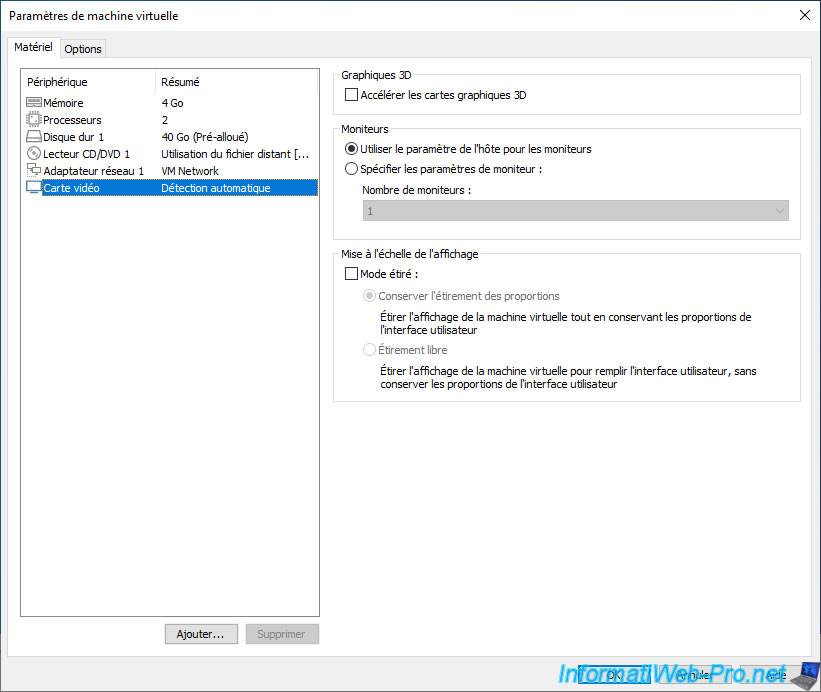
In the "Hardware" tab of your virtual machine, you can manage :
- Memory : manage your random access memory (RAM)
- Processors : manage the allocation of processors and processor cores
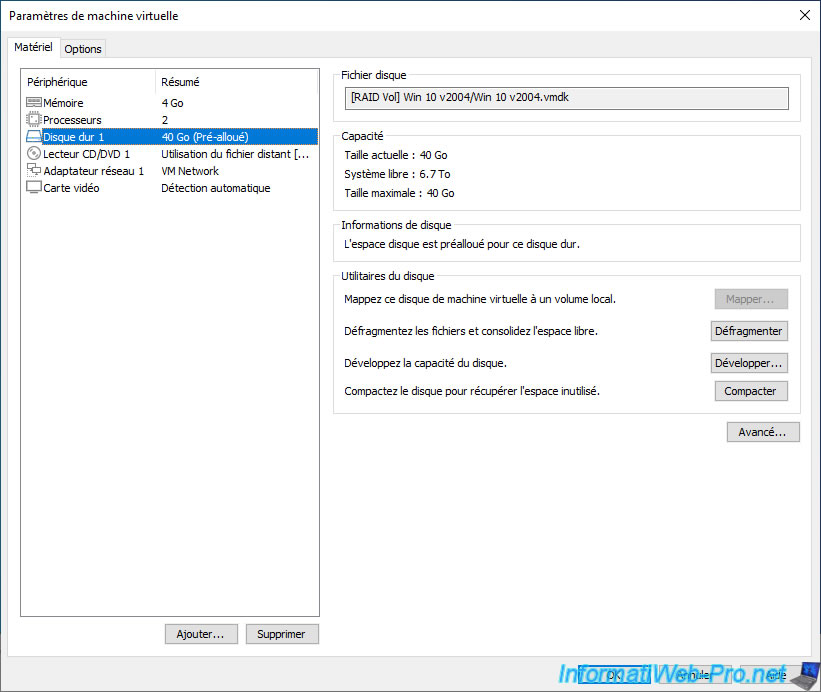
- Hard disk x : manage the virtual hard disks of this one
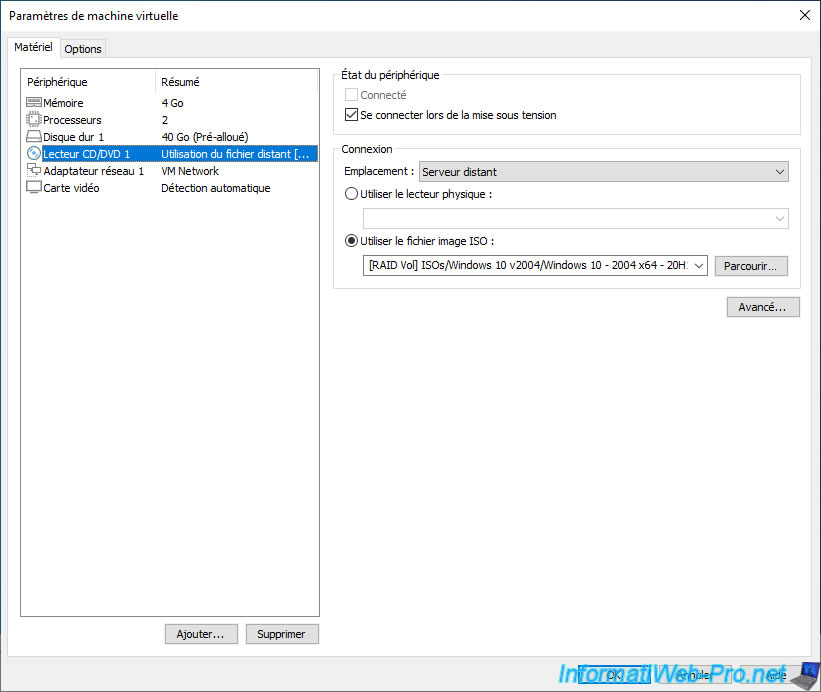
- CD/DVD drive x : manage the virtual CD/DVD drive of this one
- Network adapter x : manage its network access
- Video card : manage its graphics performance
In the "Memory" section, you can manage the amount of random access memory (RAM) to allocate to your virtual machine.
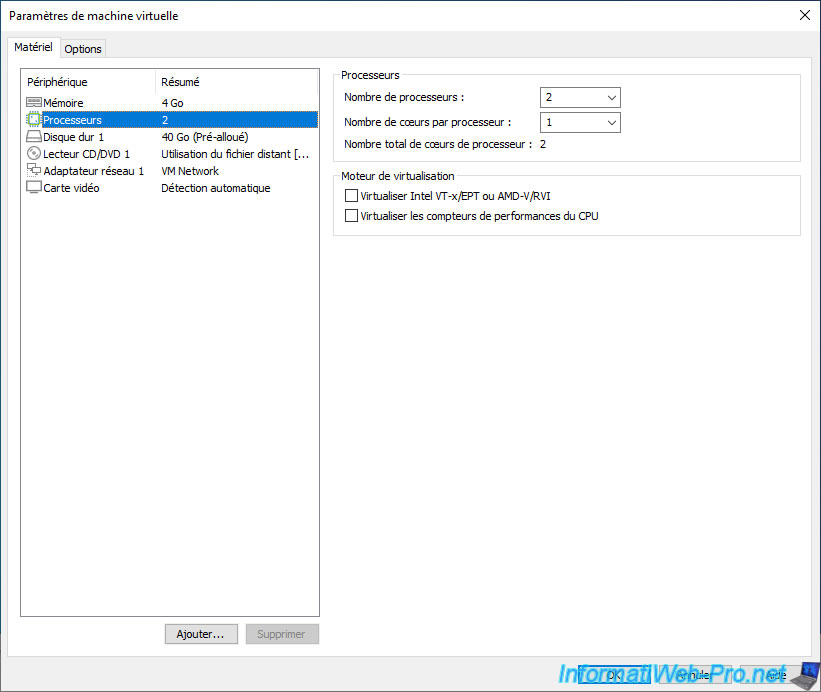
In the "Memory" section, you can manage the allocation of your sockets and/or processor cores as separate processors (sockets) and/or as processor cores.
You can therefore allocate 2 physical cores as if they were 2 separate processors in the virtual machine (or vice versa).
This can be useful if it's a prerequisite for testing specific software, for example.
You can also :
- Virtualize Intel VT-x/EPT or AMD-V/RVI : expose the virtualization features (Intel VT-x/EPT or AMD-V/RVI) to the virtual machine. This will allow you, for example, to virtualize a hypervisor such as VMware ESXi or Citrix XenServer.
- Virtualize CPU performance counters : allows you to use performance tuning tools in the guest operating system. However, this is only useful for some developers and once enabled, you will only be able to migrate this VM to a host using the same performance counters.
In the "Hard disk x" section, you will be able to manage your virtual hard disks :
- Map : allows you to map a virtual hard disk as a local disk on your computer.
However, this option is grayed out, as this is not possible remotely. - Defragment : allows you to defragment the affected virtual hard disk to regain the best possible performance with it.
- Expand : allows you to extend (enlarge) a virtual hard disk
- Compact : recovers unused space in this virtual hard disk
- Advanced : allows you to manage the position of the virtual hard disk on the controller (SCSI, IDE, SATA or NVMe), as well as whether or not the modifications should persist independently of the snapshots
In the "CD/DVD drive x" section, you can :
- Connected : connect the ISO file or the CD/DVD drive of the VMware ESXi hypervisor to the CD/DVD drive of the virtual machine
- Connect at power on : automatically connect when starting (powering on) the virtual machine
- Location : allows you to use the physical drive or an ISO image file of the VMware ESXi server (Remote Server) or your computer (Local Client).
- Use physical drive : use the physical drive of the VMware ESXi hypervisor or your computer depending on the "Location" setting above
- Use ISO image file : use an ISO file present in a datastore of your VMware ESXi hypervisor (if the location is : remote server) or an ISO file present on your computer (if the location is : local client).
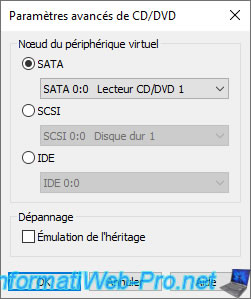
If you click on the "Advanced" button in this "CD/DVD drive x" section, you will be able to :
- Virtual device node : choose on which type of controller (SATA / SCSI / IDE) you want to plug this virtual CD/DVD drive and in what position.
- Troubleshooting - Legacy emulation : allows you to use the old emulation method for the virtual CD/DVD drive in the event of a problem.
Source : Changing Virtual Device Node and Legacy Emulation Settings
In the "Network adapter x" section, you will be able to :
- Connected : connect or not virtually connect the network cable to this virtual network adapter
- Connect at power on : allows you to connect or not the network cable virtually to it when starting (powering on) the virtual machine
- Network connection : choose on which virtual switch you want to connect this virtual machine. The management of virtual switches is possible via the web interface of VMware ESXi : VMware ESXi 6.7 - Basics of network management on VMware ESXi.
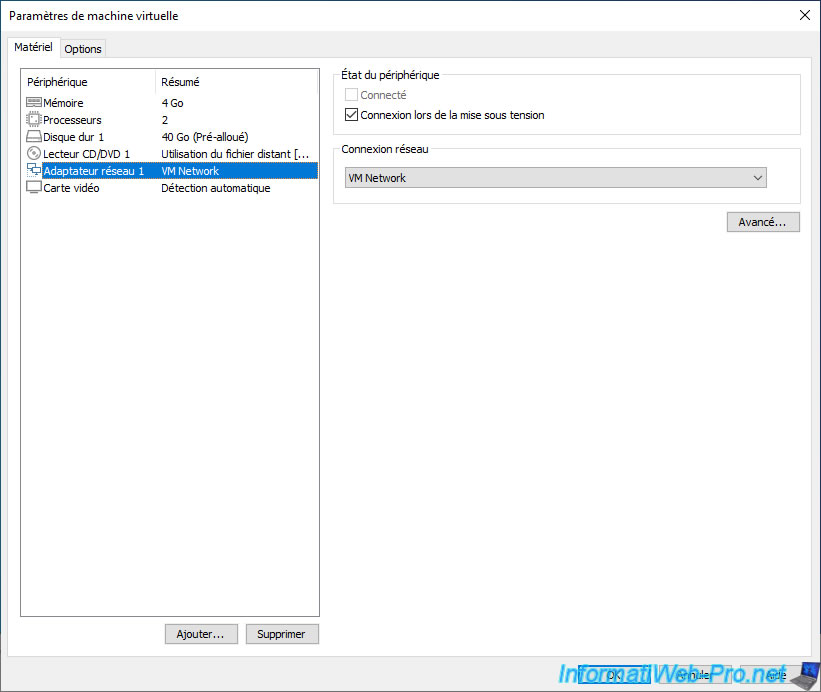
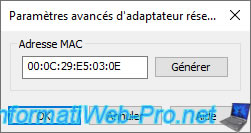
If you click on the "Advanced" button in this "Network adapter x" section, you will be able to change the MAC address of this virtual network adapter.
In the "Video card" section, you will be able to :
- Accelerate 3D graphics : take advantage of 3D acceleration in the virtual machine to virtualize graphics-intensive applications (or some games if you are using VMware ESXi at home).
- Monitors : use one or more monitors for this virtual machine depending on the number of physical monitors available
- Stretched mode : used to stretch the display of the virtual machine with or without preserving its proportions. So, the virtual machine display will be scaled on your end, but the resolution will not change in the guest system.
4.2. Manage virtual machine options
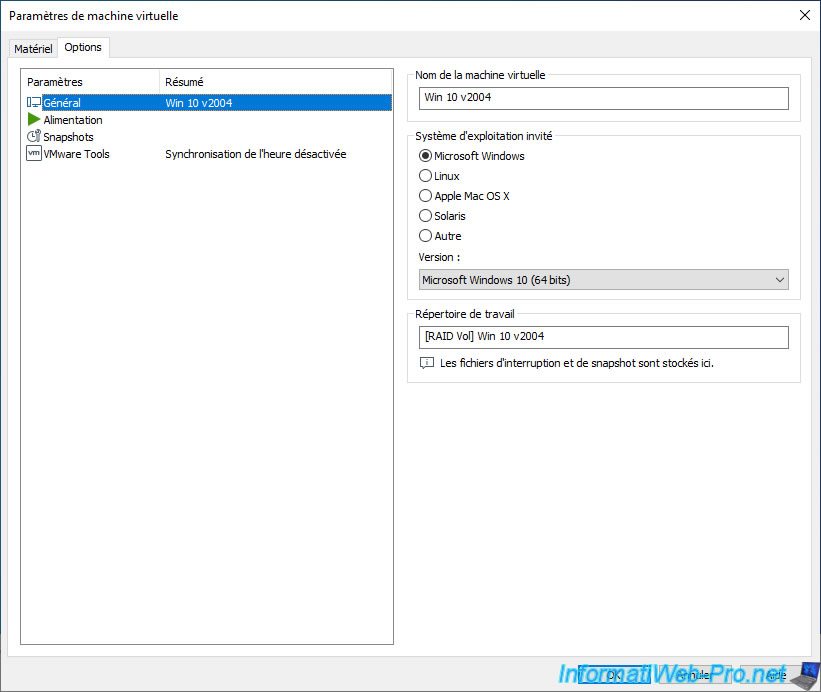
In the "General" section of your virtual machine's options, you will be able to :
- Virtual machine name : change its name
- Guest operating system : tell VMware products which guest operating system is installed in it.
Note that this influences the background configuration of the virtual hardware, the value of some settings and the choice of the "VMware Tools" virtual CD which obviously changes from one operating system to another. - Working directory : indicates where the virtual machine is stored, as well as its snapshots. In our case, in the "Win 10 v2004" folder of our "RAID Vol" datastore.
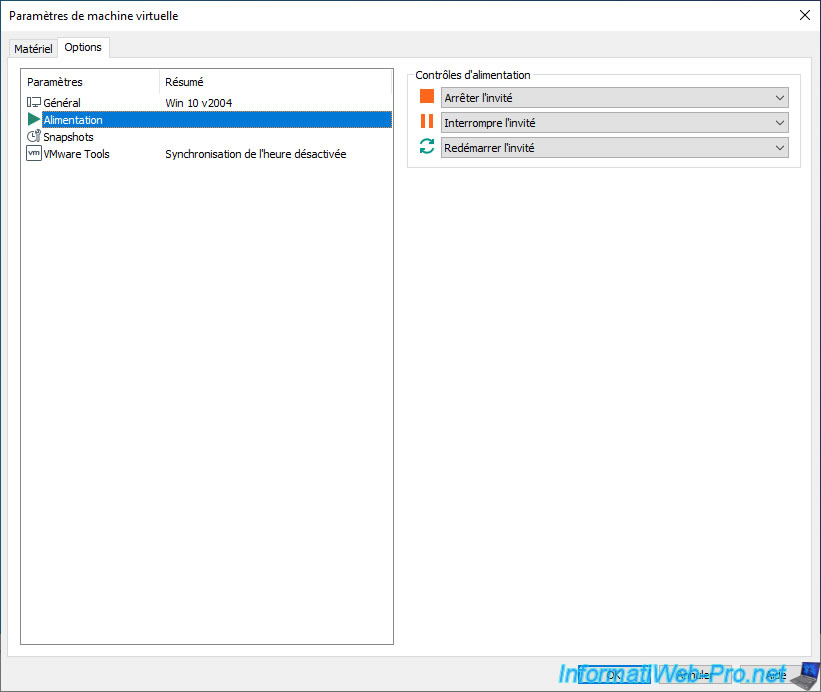
In the "Power" section, you will be able to choose which power controls to use by default at the top of this virtual machine's console.
Preferably, use the options containing the "guest" keyword to have the operating system shut down or restarted cleanly when you want to shut down or restart your virtual machine from the VMware Remote Console (VMRC) window.
- Shutdown : "Shut Down Guest" allows the guest operating system to shut down properly, while "Power off" forces the virtual machine to shutdown as if you unplug the power cable without shutting down Windows (or any other operating system) beforehand.
- Suspend : "Suspend Guest" allows you to pause the guest using VMware Tools installed in the guest system before pausing the virtual machine, while "Suspend" will pause the virtual machine before the guest when VMware Tools are not installed
- Restart : "Restart Guest" allows you to restart the guest operating system properly in the virtual machine, while "Reset" will force the virtual machine to shut down (without shutting down the guest system first), then restart it .
Note that the "... Guest" options can only function correctly when VMware Tools are installed in the guest operating system.
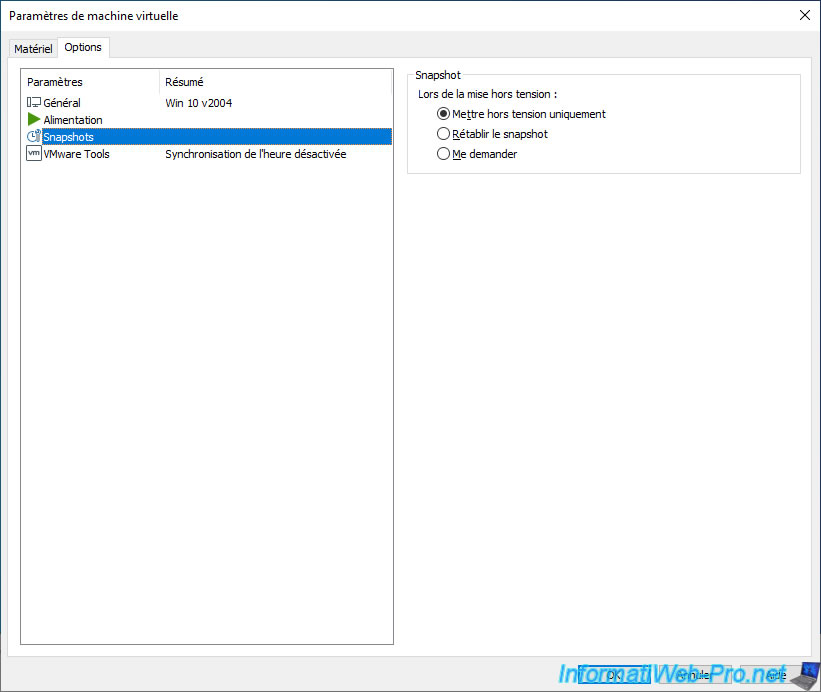
In the "Snapshots" section, you can choose the behavior to adopt when powering off this virtual machine :
- Just power off : nothing else will happen after power off
- Revert to snapshot : the last snapshot created will be automatically restored when it's powered off
- Ask me : VMware Remote Console (VMRC) will ask you what to do every time you power off your virtual machine
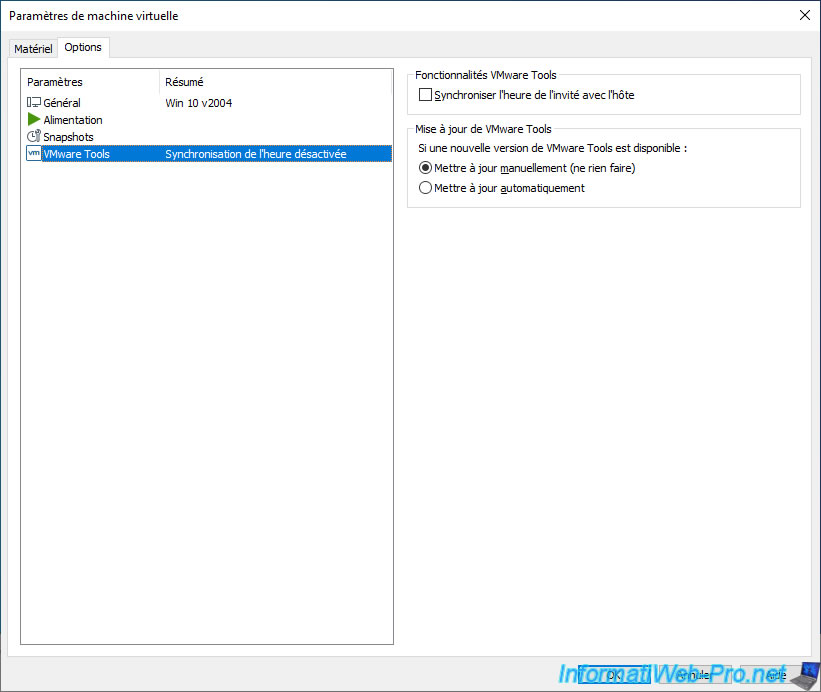
In the "VMware Tools" section, you can choose :
- Synchronize guest time with host : whether or not you want to sync guest operating system time from host
- Update manually (do nothing) : manually update VMware Tools in your virtual machine
- Update automatically : automatically update the VMware Tools in your virtual machine to be sure that they are always up to date when you use it
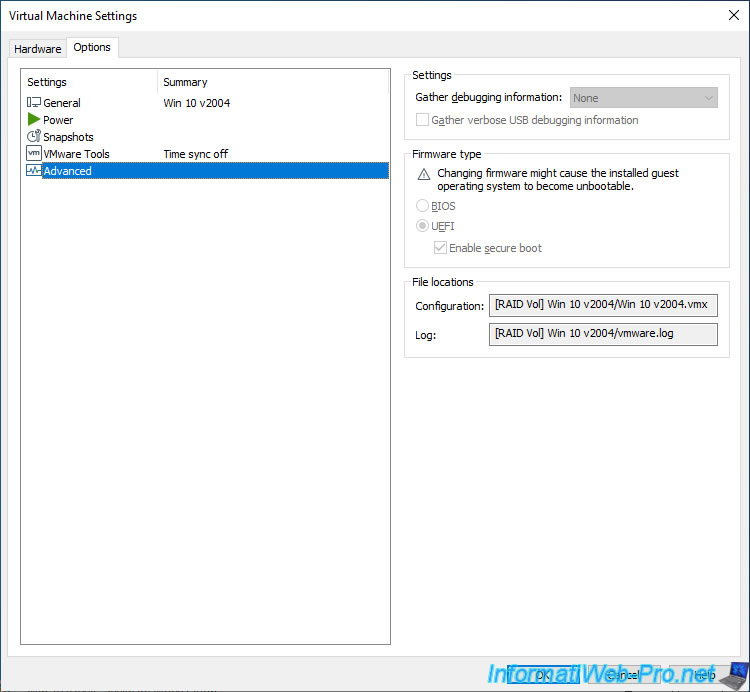
If you used VMware Workstation to manage the settings of your virtual machine running on your VMware ESXi hypervisor, you will have an additional section : Advanced.
In this "Advanced" section, you will be able to :
- Gather debugging information : manage the level of detail for the system logs of this virtual machine, as well as for the information about the USB (if the generation of system logs is enabled)
- Firmware type : choose whether you want to start it with a classic BIOS or with an UEFI firmware.
If you choose UEFI, you can enable Secure Boot if this is supported by the guest operating system.
Warning : changing between BIOS and UEFI may prevent the guest operating system from booting. Indeed, you must make this choice before installing the guest operating system and not after its installation.
However, changing it temporarily can, for example, allow you to start a virtual machine on a live CD to repair the guest system. - File locations - Configuration : know the location of its configuration file (.vmx). By default, the virtual machine folder.
- File locations - Log : the location of the "vmware.log" log file (if the virtual machine is started). Same default folder as for its configuration file.
Share this tutorial
To see also
-

VMware 5/25/2022
VMware ESXi 6.0 - Install the VMware Host Client web client
-

VMware 5/27/2022
VMware ESXi 6.5 - Add a network driver in the installation ISO
-

VMware 1/27/2023
VMware ESXi 6.7 - Enable virtualization-based security (VBS)
-

VMware 12/2/2022
VMware ESXi 6.7 - Install and use the VMRC console on Linux
No comment