- Linux
- 12 March 2015 at 14:09 UTC
-


On Linux, you can share files using the NFS protocol. This protocol is also used by NAS and Linux-based systems (such as VMware ESXi and Citrix XenServer).
Here is the network configuration we used for this tutorial :
- NFS server IP : 10.0.0.102
- NFS client IP : 10.0.0.101
1. Install a NFS server
To install a Linux NFS server, type the following command :
Bash
apt-get install nfs-kernel-server nfs-common
At the end of the installation, a warning is displayed.
Note : This is normal, because we didn't set the folders to "export" (sharing).
Plain Text
[warn] Not starting NFS kernel daemon: no exports. ... (warning)
To begin, create a folder in "/var" and give all rights to the root user. The others will have only readings and access rights.
Bash
mkdir /var/shared-data
chown root:root /var/shared-data
chmod 755 /var/shared-data
To share this folder, specify one of these four options in the "/etc/exports" file :
Plain Text
# This shared folder is available for read and write but only from the IP address : 10.0.0.101
/var/shared-data        10.0.0.101(rw,sync,fsid=0,crossmnt,no_subtree_check,no_root_squash)
Plain Text
# This shared folder is available for read only and only accessible from the IP address : 10.0.0.101
/var/shared-data        10.0.0.101(ro,sync,fsid=0,crossmnt,no_subtree_check,no_root_squash)
Plain Text
# This shared folder is available for read and write and accessible through the network : 10.0.0.0/255.0.0.0
/var/shared-data        10.0.0.0/255.0.0.0(rw,sync,fsid=0,crossmnt,no_subtree_check,no_root_squash)
Plain Text
# This shared folder is read-only and accessible to everyone
/var/a-public-folder *(ro,insecure,all_squash)
For more information about the options that you can use, see the Ubuntu Documentation : NFS mount options
Finally, restart the NFS server.
Bash
service nfs-kernel-server restart
2. Install a NFS client
Warning :
The use of this procedure under Ubuntu (Version 12.04 LTS only) causes the message "mountall disconnected from plymouth".
If you use the 14.04 version, this procedure will work correctly.
First, install the NFS client for Linux.
Bash
apt-get install nfs-common
Then, create a folder for the mount point :
Bash
mkdir -p /mnt/nfs/var/shared-data
Mount the NFS share on the folder you just created.
Bash
mount 10.0.0.102:/var/shared-data /mnt/nfs/var/shared-data
List the file systems available on the client.
Bash
df -h
This command will display something like this.
Note : In the last line, you will find the shared folder mount point.
Plain Text
Filesystem                                               Size  Used Avail Use% Mounted on
rootfs                                                    19G  3,7G   15G  21% /
udev                                                      10M     0   10M   0% /dev
tmpfs                                                    405M  644K  405M   1% /run
/dev/disk/by-uuid/7504b371-b24c-42a7-aa56-1d651899eecd    19G  3,7G   15G  21% /
tmpfs                                                    5,0M     0  5,0M   0% /run/lock
tmpfs                                                    986M  372K  986M   1% /run/shm
10.0.0.102:/var/shared-data                               15G  3,4G   11G  25% /mnt/nfs/var/shared-data
Try to create a file in the "/mnt/nfs/var/shared-data" folder (the shared folder).
Bash
touch /mnt/nfs/var/shared-data/fichier.txt
Then, on the server, list the contents of the "/var/shared-data/" folder.
If all goes well, a "file.txt" file is present in this folder.
Bash
ls -l /var/shared-data/
Warning, if you restart the client computer, the mount point will disappear.
To mount the folder at the the computer boot, edit the "/etc/fstab" file by adding this :
Plain Text
10.0.0.102:/var/shared-data /mnt/nfs/var/shared-data nfs rw,sync,hard,intr 0 0
To test this configuration, remove the existing mount point.
Bash
umount /mnt/nfs/var/shared-data
To test the "/etc/fstab" configuration file without having to restart the Linux machine, use this command :
Bash
mount -a
If all goes well, the "/mnt/nfs/var/shared-data" folder will contain the file you created earlier.
Bash
ls -l /mnt/nfs/var/shared-data
And the mount point will be displayed by the "df -h" command :
Bash
df -h
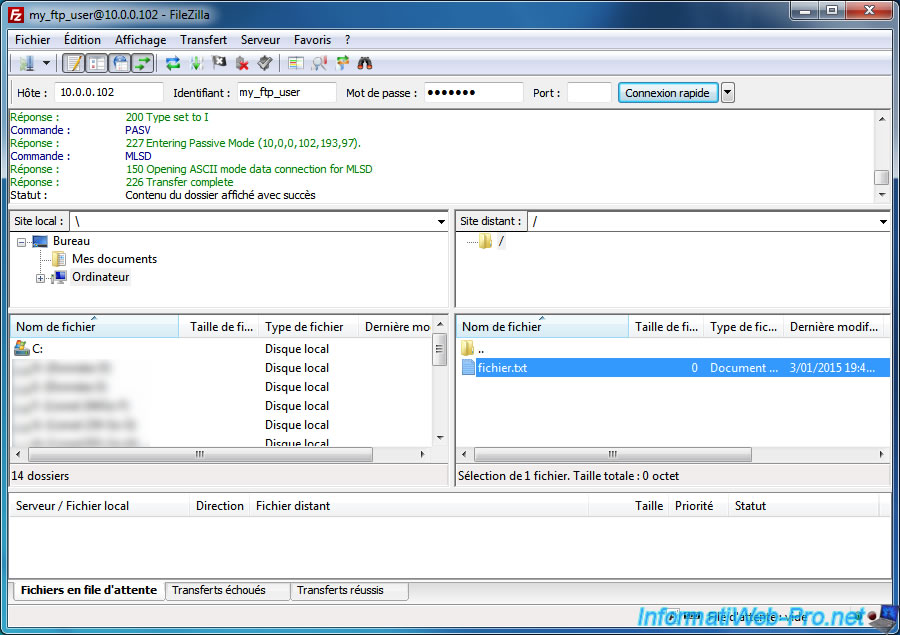
3. Optional : Map a FTP share for non-Linux clients
If needed, you can also install an FTP server to access the same data via the FTP protocol.
To do this, install ProFTPD by following this tutorial : Debian / Ubuntu - Install a FTP server
Once installed and configured, create a user by specifying the desired folder as the home folder.
So, when you log in by using this user, you access the desired folder.
Bash
useradd --home /var/shared-data my_ftp_user
Specify a password for this user.
Bash
passwd my_ftp_user
And set this user as the owner of this folder.
Bash
chown -R my_ftp_user:my_ftp_user /var/shared-data
To check the rights of this folder, use the following command :
Bash
ls -l /var/shared-data
Now, you can access this folder from any OS using a simple FTP client.
Share this tutorial
To see also
-

Linux 7/21/2017
Debian - Clustering and service balancing (with 2 servers)
-

Linux 10/2/2016
Install and use the LVM on Linux
-
Linux 2/12/2016
OVH - KVM mode
-

Linux 1/11/2014
Ubuntu - Enable root account
You must be logged in to post a comment