- VMware
- 06 June 2024 at 18:05 UTC
-

- 1/2

VMware PowerCLI is a command line tool provided by VMware to manage and automate your VMware virtual infrastructure.
- What is VMware PowerCLI ?
- Install VMware PowerCLI through PowerShell instead of MSI installer
- Required configuration
- Install VMware PowerCLI from the Internet
- Install VMware PowerCLI without Internet (offline) from PowerShell
- Install VMware PowerCLI without Internet (offline) from a zip file
- Create desktop shortcut for VMware PowerCLI
1. What is VMware PowerCLI ?
VMware PowerCLI is a command line tool usable from Windows PowerShell that enables millions of customers to manage and automate their VMware infrastructure.
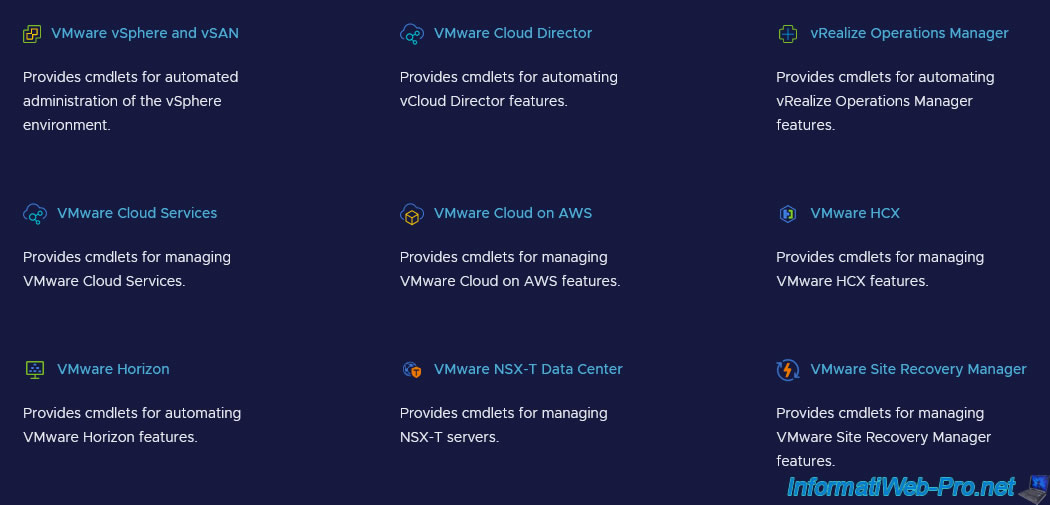
Thanks to VMware PowerCLI, you will be able to connect from the command line to different VMware solutions :
- VMware vSphere and vSAN, including VMware ESXi, VMware vCenter Server, ...
- VMware Cloud Director
- vRealize Operations Manager
- VMware Cloud Services
- VMware Cloud on AWS (Amazon Web Services)
- VMware HCX
- VMware Horizon
- VMware NSX-T Data Center
- VMware Site Recovery Manager
Thanks to VMware PowerCLI, you can automate the deployment or adjustment of different resources, such as storage (datastores, virtual hard disks), network, clusters, ...
For more information about the possibilities offered by VMware PowerCLI, as well as the commands available by VMware product, refer to the "VMware PowerCLI" page of the official VMware website (see link previously cited).
2. Install VMware PowerCLI through PowerShell instead of MSI installer
Previously, until version 6.5R1, VMware PowerCLI was available as a classic installer (exe / msi).
However, starting with version 6.5.1 of VMware PowerCLI, you will need to download it from a PowerShell command prompt (Windows PowerShell).
Source : Welcome PowerCLI to the PowerShell Gallery – Install Process Updates.
Note that if you still have an older version of VMware PowerCLI, you will need to uninstall it before downloading the new version through PowerShell.
Then, don't forget to delete the "C:\Program Files (x86)\VMware\Infrastructure\" folder once it's uninstalled.
Indeed, since version 6.5.1 of VMware PowerCLI, it's available from PowerShell Gallery.

3. Required configuration
3.1. Know your version of PowerShell
As stated earlier, to download VMware PowerCLI, you will need Windows PowerShell.
This Windows PowerShell command prompt has been available natively since Windows 7, but the version of PowerShell installed in it by default varies from one version of Windows to another.
- Windows 7 SP1 : PowerShell 2.0
- Windows 8 / Windows Server 2012 : PowerShell 3.0
- Windows 8.1 / Windows Server 2012 R2 : PowerShell 4.0
- Windows 10 (versions 1507 and 1511) : PowerShell 5.0
- Windows 10 (version 1607 and later) / Windows Server 2016 et 2019 : PowerShell 5.1
Source : Windows PowerShell System Requirements.
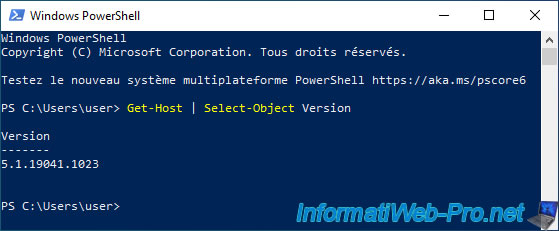
To know your version of PowerShell, launch it and type this command :
PowerShell
Get-Host | Select-Object Version
Which will show this on Windows 10 v2004 :
Plain Text
Version
-------
5.1.19041.1023
3.2. Know the version of VMware PowerCLI required for your VMware infrastructure
Before attempting to install the "VMware PowerCLI" module, it's important to know which version of VMware PowerCLI you need to manage your VMware infrastructure.
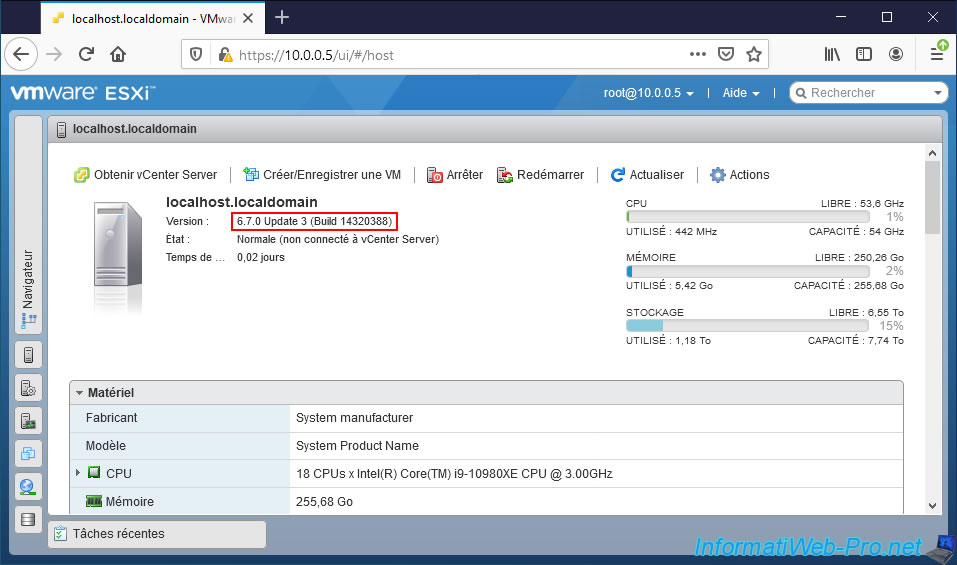
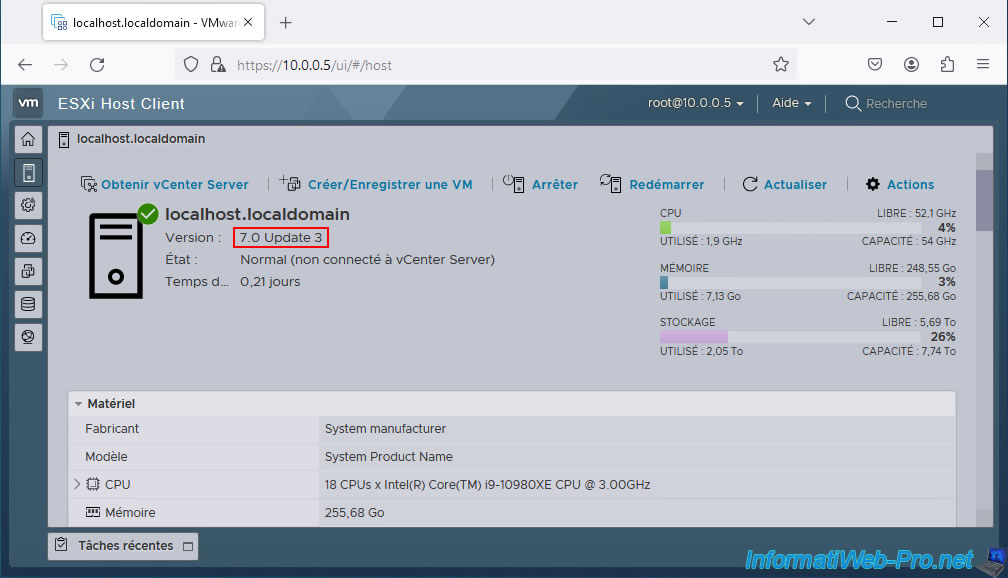
For this tutorial, we will take the example of the "VMware ESXi 6.7.0 Update 3" hypervisor on which all of our tutorials about VMware ESXi are based.
For VMware ESXi 7, we used version 7.0 Update 3.
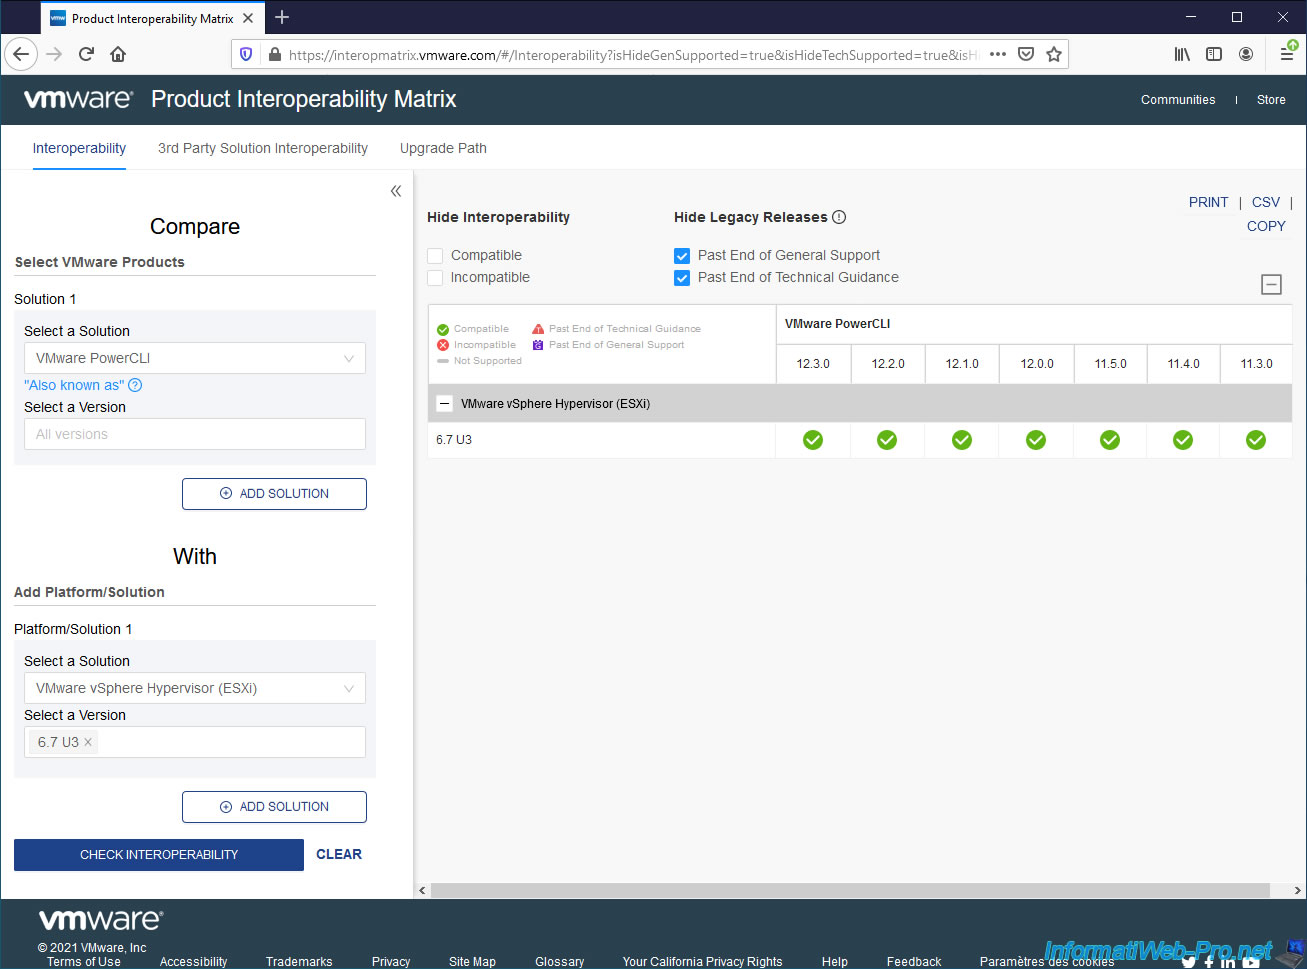
To know the version of VMware PowerCLI required to manage a VMware ESXi 6.7 Update 3 hypervisor, refer to the "VMware - Product Interoperability Matrix" page.
On the left, specify :
- Compare : VMware PowerCLI - All versions.
- With : VMware vSphere Hypervisor (ESXi) - 6.7 U3.
Then, click on the "Check interoperability" button.
As you can see, VMware tells you that "VMware vSphere Hypervisor (ESXi) 6.7 U3" can be managed from VMware PowerCLI in version 12.3.0, 12.2.0, 12.1.0, ...
3.3. Know the version of PowerShell required by the version of VMware PoweCLI desired
Since VMware PowerCLI depends on PowerShell, its necessary to use a compatible version of PowerShell.
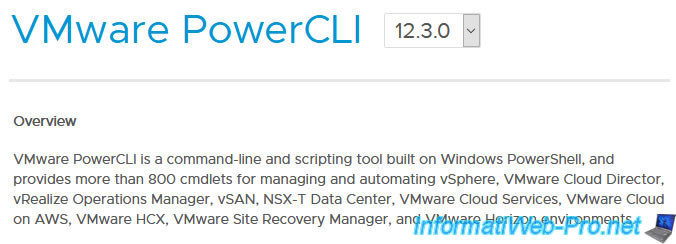
To do this, go to the "VMware PowerCLI" page and select the version of VMware PowerCLI you want to use.
In our case : version 12.3.0.
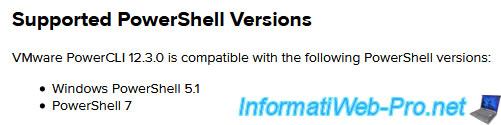
In the "Documentation and Reference" section of the page that appears, click the "Compatibility matrix" link.
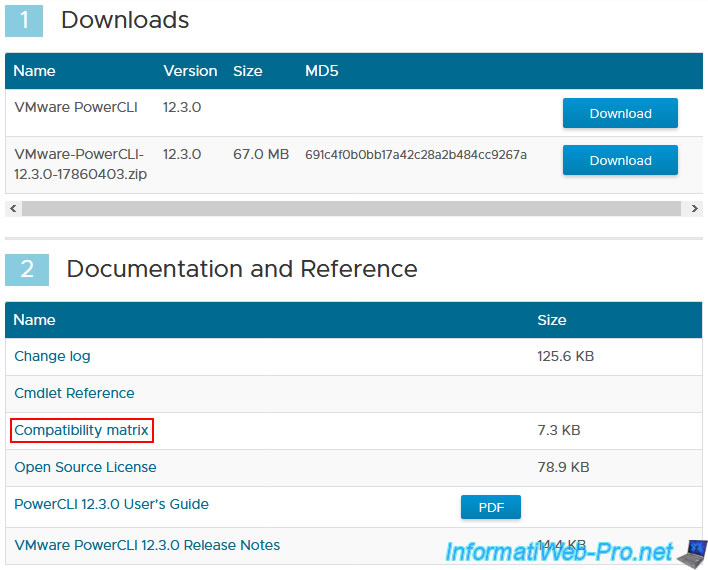
On the "Compatibility Matrixes for VMware PowerCLI [desired version]" page that appears, you will find information about the system requirements for the desired version of PowerCLI.
There, you will also find a "Supported PowerShell Versions" section with the PowerShell versions required for this version of PowerCLI.
3.4. Update your version of PowerShell
To update your version of Windows PowerShell, see the "System requirements for Windows PowerShell" page to find out which version of Windows and/or Windows Server is compatible with which version of PowerShell, as well as what you will need to install to update Windows PowerShell on your computer or server.
This usually comes down to installing the corresponding version of "Windows Management Framework" compatible with your version of Windows or Windows Server.
For example, to update Windows PowerShell to version 5.1, all you have to do is install "Windows Management Framework 5.1" on a compatible version of Windows or Windows Server.
As a reminder, Windows PowerShell is available by default in version 5.1 on Windows 10 (version 1607 and later), as well as on Windows Server 2016 and 2019.
In our case, we used a computer running Windows 10 v2004.
4. Install VMware PowerCLI from the Internet
The 1st method (recommended) to install VMware PowerCLI consists in downloading the "VMware.PowerCLI" module via a PowerShell command prompt (available natively since Windows 7).
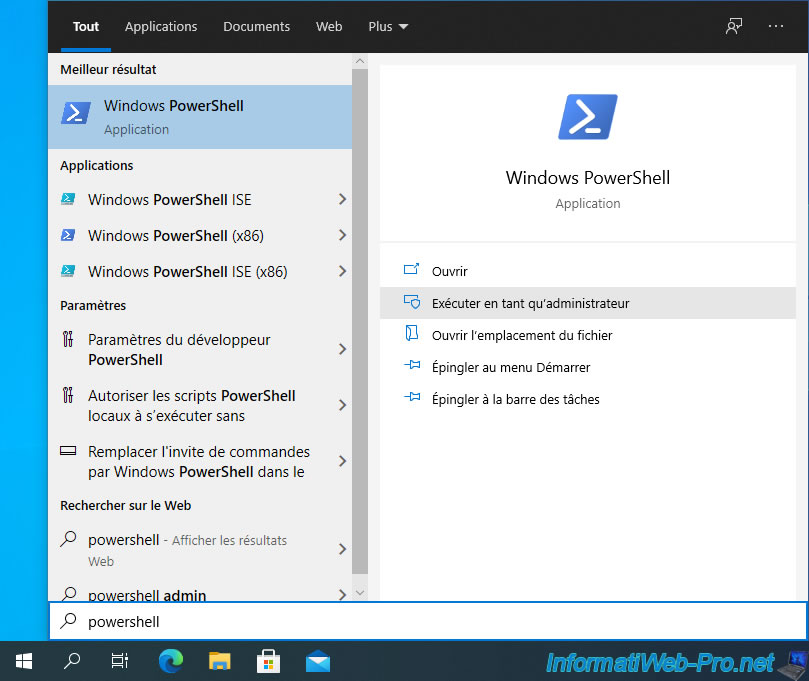
To launch "PowerShell", open the Windows start menu or touchscreen interface (depending on your version of Windows) and run it as administrator.
If needed, right click on "Windows PowerShell" and click "Run as administrator".
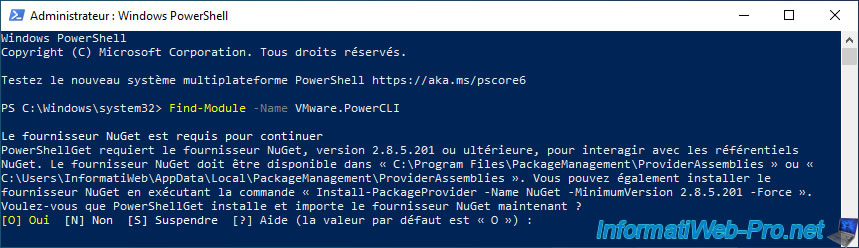
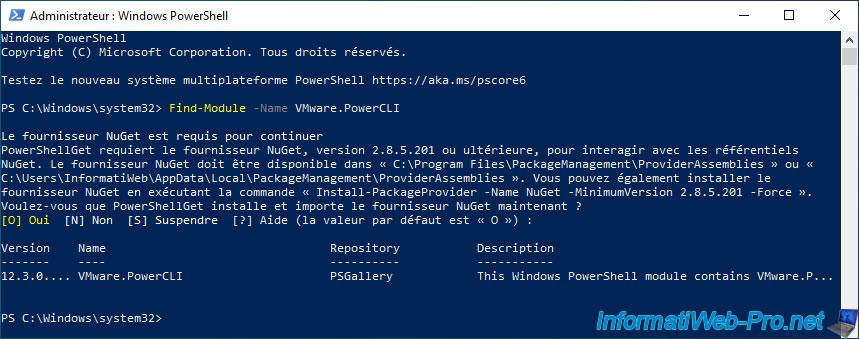
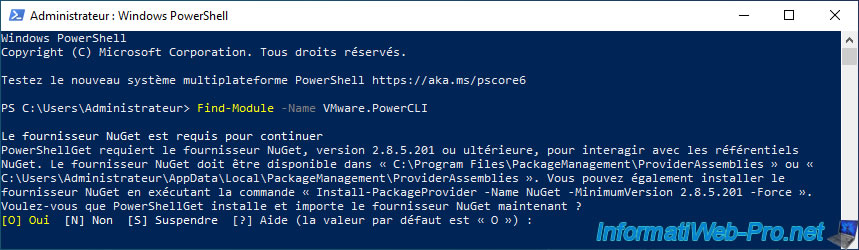
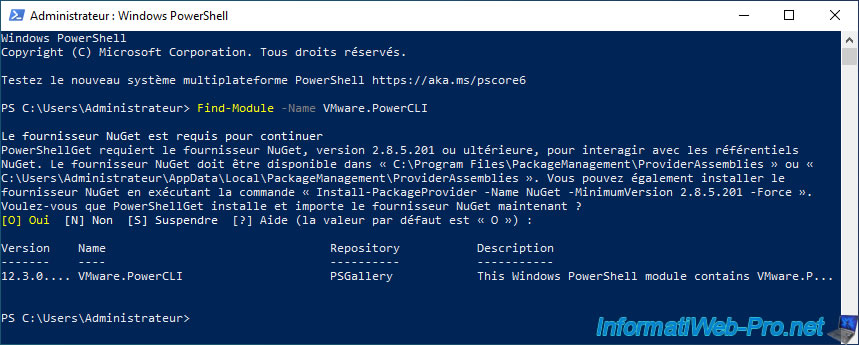
In the "Windows PowerShell" command prompt launched as administrator, type the following command to verify that you have access to the "PSGallery" repository where the "VMware.PowerCLI" module is located :
PowerShell
Find-Module -Name VMware.PowerCLI
If the "NuGet provider is required to continue" message appears, answer "Y" to install this one.
Once the NuGet provider is installed, this command will show you :
- Version : the version of the searched package. In our case : 12.3.0 ...
- Name : the name of the requested package. In this case : VMware.PowerCLI.
- Repository : the repository where it's located.
- Description : the description of this package.
To install this "VMware.PowerCLI" module for the current user only, use the command below.
This will install this module in the "Documents\PowerShell\Modules" folder of the current user.
The advantage is that this command doesn't require administrator rights, since the module will be stored in a sub-directory of the user.
PowerShell
Install-Module -Name VMware.PowerCLI -Scope CurrentUser
If you want to install this module for all users of your computer, then use this command :
PowerShell
Install-Module -Name VMware.PowerCLI -Scope AllUsers
By default, PowerShell will install the latest version of VMware PowerCLI available.
To install an old version of this module, specify the desired version using the "-RequiredVersion" parameter.
PowerShell
Install-Module -Name VMware.PowerCLI -Scope CurrentUser -RequiredVersion 12.3.0.17860403
Then, if the "Untrusted repository" message appears, answer "Y" to authorize the installation of modules from the "PSGallery" repository.

The installation of the "VMware.PowerCLI" module starts.

Thus, that the installation of the dependent packages of this one.

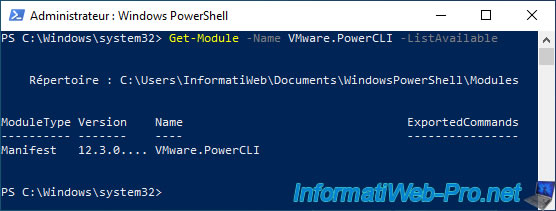
To check if the module has been installed correctly, use the command :
PowerShell
Get-Module -Name VMware.PowerCLI -ListAvailable
5. Install VMware PowerCLI without Internet (offline) from PowerShell
If the computer or server where you want to install the VMware PowerCLI module doesn't have Internet access, or the filtering configured by your system administrator doesn't allow you to download this module through PowerShell from that computer, here is how to download it through a other computer that has Internet access.
On the computer with Internet access, launch a PowerShell command prompt as administrator.
To do this, search for "PowerShell" and click "Run as administrator" for the "Windows PowerShell" program.
To verify that you have access to the Internet and to the repository where the "VMware.PowerCLI" module is located, use the command :
PowerShell
Find-Module -Name VMware.PowerCLI
If PowerShell asks you to install the NuGet provider, answer "Y" to install it.
Once this provider is installed, PowerShell will tell you that the "VMware.PowerCLI" module is available in the "PSGallery" repository.
Create a folder where you want it on your hard disk to download the VMware.PowerCLI module, as well as the packages which depend on it.
If you wish, create this folder from the command line using the "mkdir" command.
Download the "VMware.PowerCLI" module in the desired folder by typing :
PowerShell
Save-Module -Name VMware.PowerCLI -Path C:\Users\Administrateur\Downloads\PowerCLI
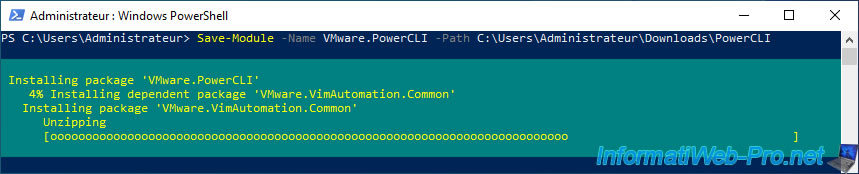
The packages which depend on this "VMware.PowerCLI" module will also be downloaded and stored in the folder specified in parameter.
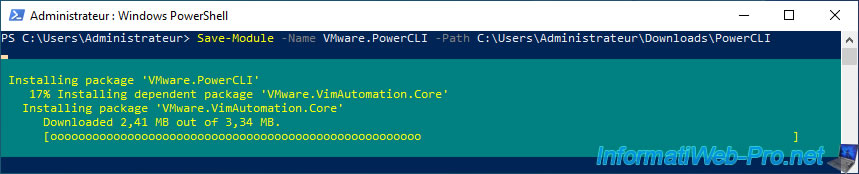
Once you have finished downloading and saving this module in the desired folder, the turquoise frame will disappear.

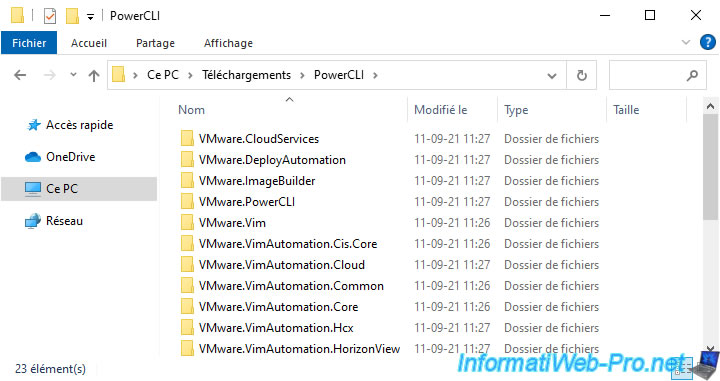
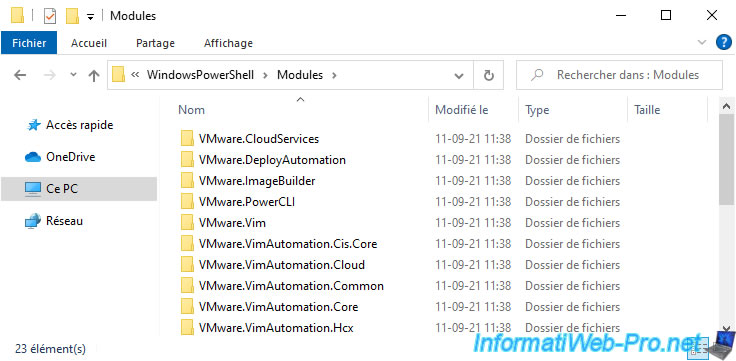
To see the list of packages in the folder specified previously, use the "Get-ChildItem" command :
PowerShell
Get-ChildItem -Path C:\Users\Administrateur\Downloads\PowerCLI
As you can see, this "VMware.PowerCLI" module contains many VMware.VimAutomation packages, as well as other VMware packages.
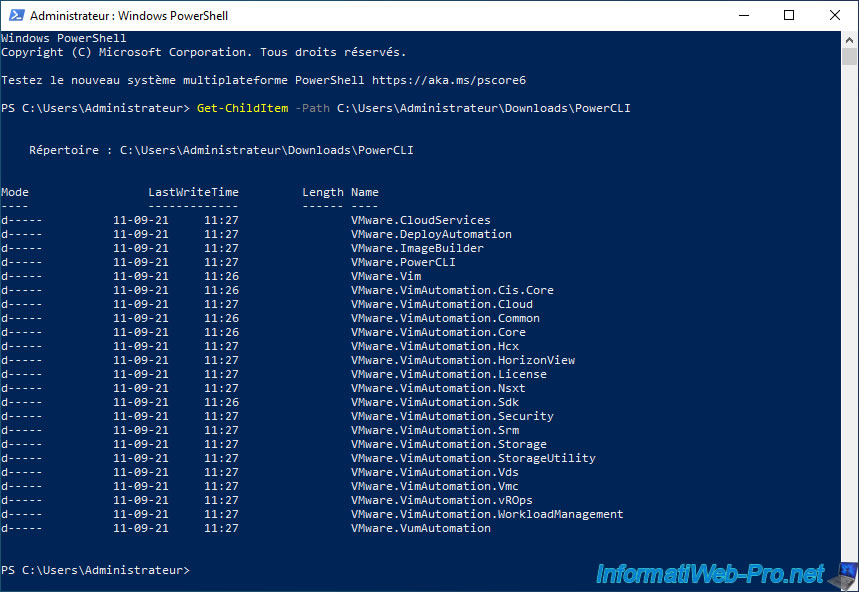
If you open the folder created previously, you will see that all the packages shown above are there.
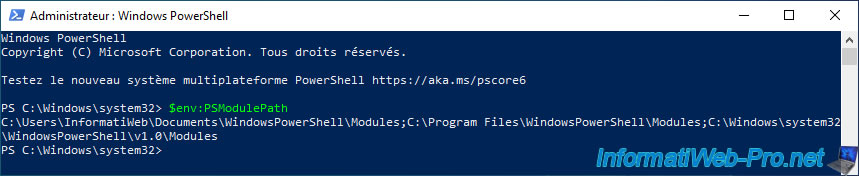
On the destination computer where you want to install this "VMware.PowerCLI" module, open a PowerShell command prompt as administrator and display the list of folders where PowerShell looks for locally installed modules by typing this :
PowerShell
$env:PSModulePath
Which indicates in our case :
- the "C:\Users\[current user name]\Documents\WindowsPowerShell\Modules" folder for modules installed for the current user.
- the "C:\Program Files\WindowsPowerShell\Modules" folder for modules installed on the computer for all users.
- the "C:\Windows\System32\WindowsPowerShell\v1.0\Modules" folder for the modules installed by default for all users of the computer.
To install the "VMware.PowerCLI" module on the destination computer, you will therefore have to copy the downloaded folders into one of these folders.
In our case, we are going to install this "VMware.PowerCLI" module for the currently logged in user.
However, as you can see, by default the "WindowsPowerShell\Modules" subfolder is not created in user documents.
Create the "WindowsPowerShell" folder, then go into it and create the "Modules" subfolder.
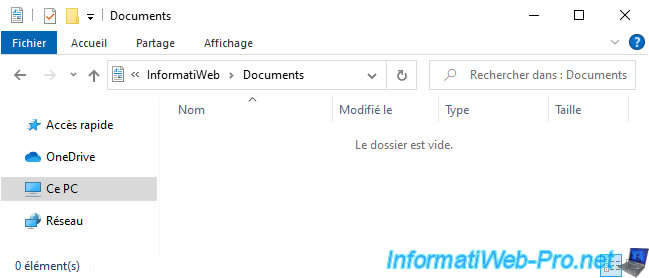
Which gives the path : C:\Users\[current user name]\Documents\WindowsPowerShell\Modules.
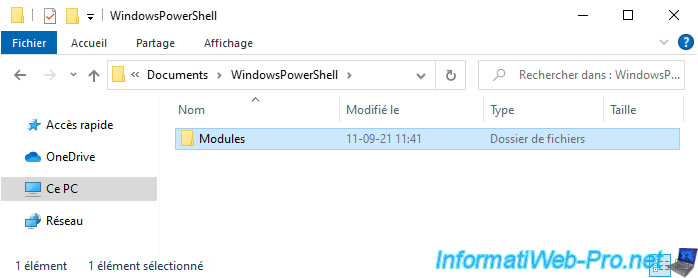
In this "Modules" subfolder, paste all the "VMware.xxxx" folders downloaded from the other computer.
Then, launch a "Windows PowerShell" command prompt and type the command :
PowerShell
Get-Module -Name VMware.PowerCLI -ListAvailable
As you can see, PowerShell tells us that it found the "VMware.PowerCLI" module in the "C:\Users\[current user name]\Documents\WindowsPowerShell\Modules" folder.
Share this tutorial
To see also
-
VMware 4/14/2023
VMware ESXi 6.7 - Best practices for creating a VM
-
VMware 2/17/2023
VMware ESXi 6.7 - Configure your virtual machines settings
-
VMware 6/2/2023
VMware ESXi 6.7 - Connect a smart card reader to a VM
-
VMware 10/19/2022
VMware ESXi 6.7 - DirectPath I/O (PCI passthrough)
You must be logged in to post a comment