Configure a multi-site Active Directory infrastructure on Windows Server 2022 and 2016
- Windows Server
- 10 November 2025 at 17:31 UTC
-

- 11/11

14. Join Windows 10 computers to your multi-site Active Directory infrastructure
14.1. Join a Windows 10 client computer to your Active Directory domain at site 1 (Brussels)
To join a Windows 10 client computer to your Active Directory domain, it simply needs to know the IP address of at least one of your local AD domain controllers.
This should already be the case, since your client computers are supposed to receive their network configuration from the DHCP server on your network (at the relevant local site).
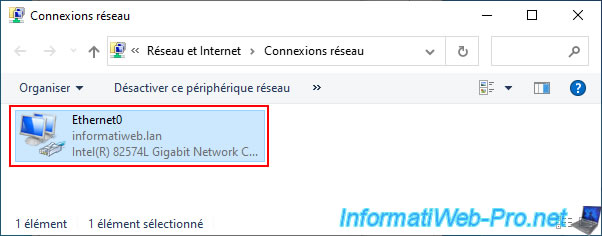
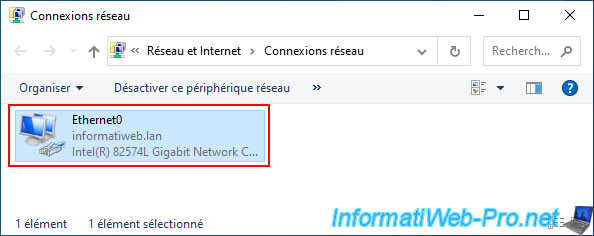
On a Windows 10 computer, search for the "View network connections" setting using the Start menu search engine, then double-click on your "Ethernet0" network connection.
Then, click the "Details" button in the "Ethernet0 Status" window that appears.
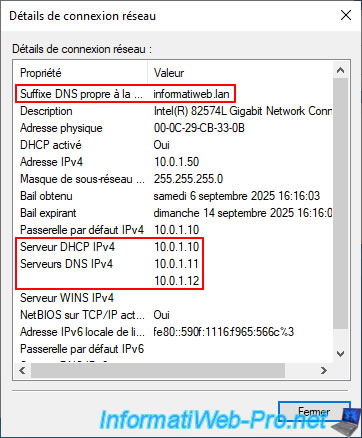
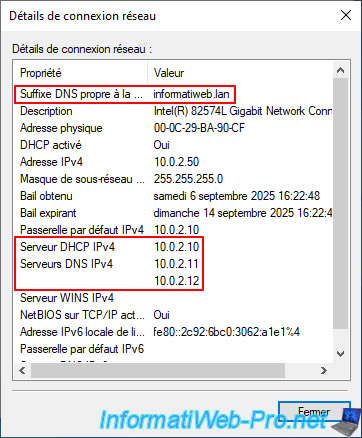
If your DHCP server is configured correctly and it was enabled (as a reminder, you needed to authorize your DHCP server in AD for it to work), you should see these values:
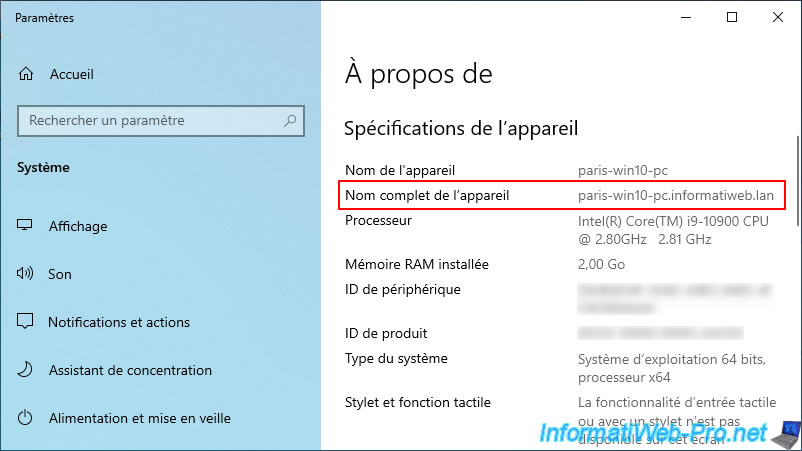
- Connection-specific DNS suffix: informatiweb.lan (your Active Directory domain).
This is simply the suffix used by default if you type a short name (such as a NETBIOS name) for a server or computer on your network.
This does not mean that the computer is a member of your Active Directory domain. - IPv4 Address: a unique IP address for this PC (whose subnet is the same as Site 1 (Brussels).
- Subnet Mask: 255.255.255.0 (which allows the "10.0.1.X" subnet to be used here).
- IPv4 Default Gateway: the IP address of your VPN server, which also acts as a router (via its "NAT" section, correctly configured in the "Routing and Remote Access" console).
- IPv4 DHCP Server: 10.0.1.10 (the IP address of the DHCP server at the site where this client computer is located).
So, in our case, the IP address of the "brux-vpn" server, given that this client computer is located at Site 1 (Brussels). - IPv4 DNS Servers: 10.0.1.11 (brux-dc1) and 10.0.1.12 (brux-dc2).
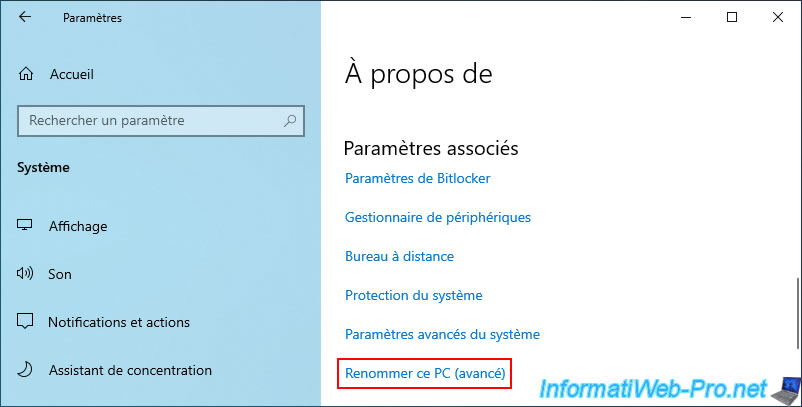
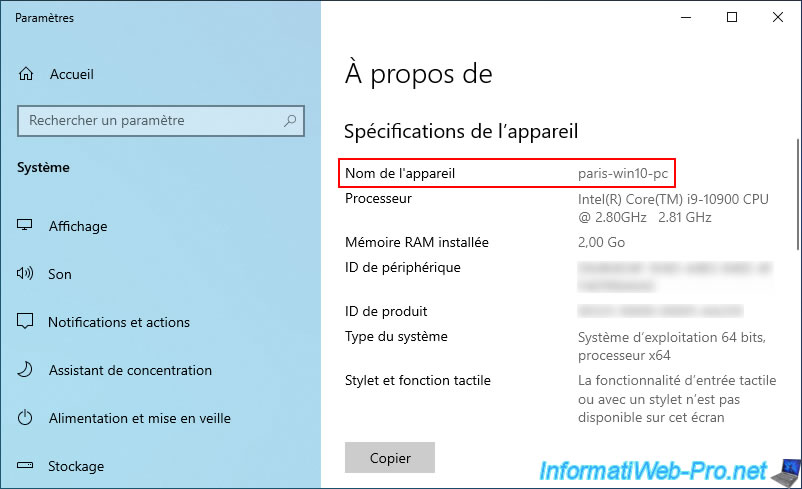
For example, this Windows 10 computer is named "brux-win10-pc" because it is located at Site 1 (Brussels).
To join it to your Active Directory domain, open File Explorer, then right-click "Properties" on "This PC".

Then, at the bottom of the window, click the "Rename this PC (advanced)" link.
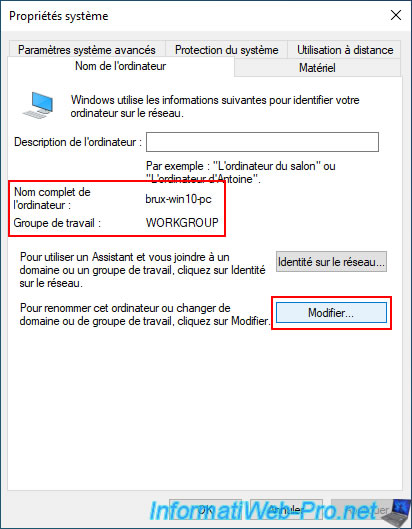
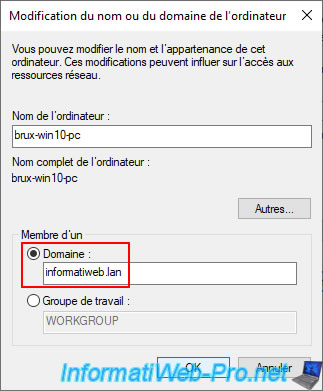
Currently, you can see that this computer, "brux-win10-pc," is in the "WORKGROUP" workgroup.
Click the "Edit" button.
Select "Domain" and type your Active Directory domain name (the DNS domain name this time, not the NETBIOS domain name as you did when setting up your demand-dial credentials earlier).
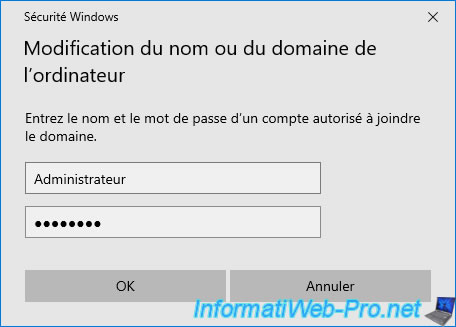
Specify the credentials of an account authorized to join this computer to the AD domain.
As expected, your computer has been joined to your AD domain.
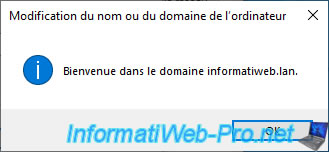
Click "Close".
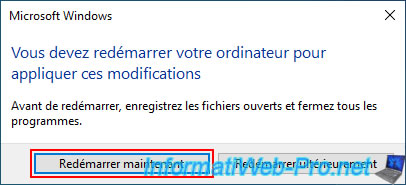
For the computers and servers you link to your Active Directory domain, you can restart them directly.
Note: the subsequent restart only affected the VPN servers, as they maintain the connection between your two physical sites.
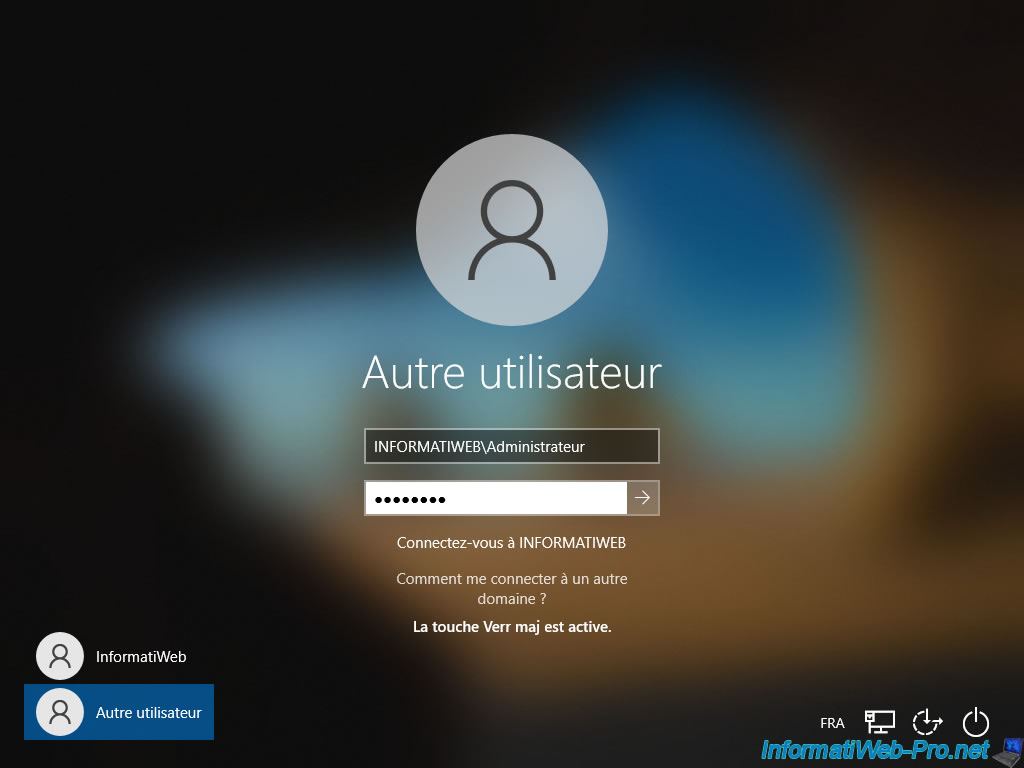
Upon reboot, you will be able to log in with a domain user account.
Note: if you receive an error regarding a computer account that is missing from your Active Directory infrastructure, it means that the computer account was created on a domain controller at the physical site where you are located, and then that same computer is attempting to authenticate you via the second domain controller at the same site (where the corresponding computer account is temporarily missing).
If necessary, force AD data replication with the "repadmin ..." command mentioned above (to be run on the domain controller where the computer account corresponding to this computer is located).
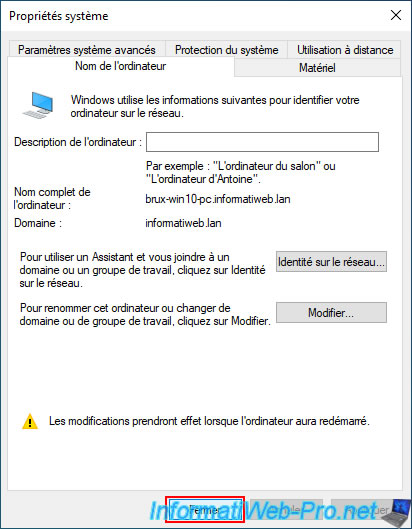
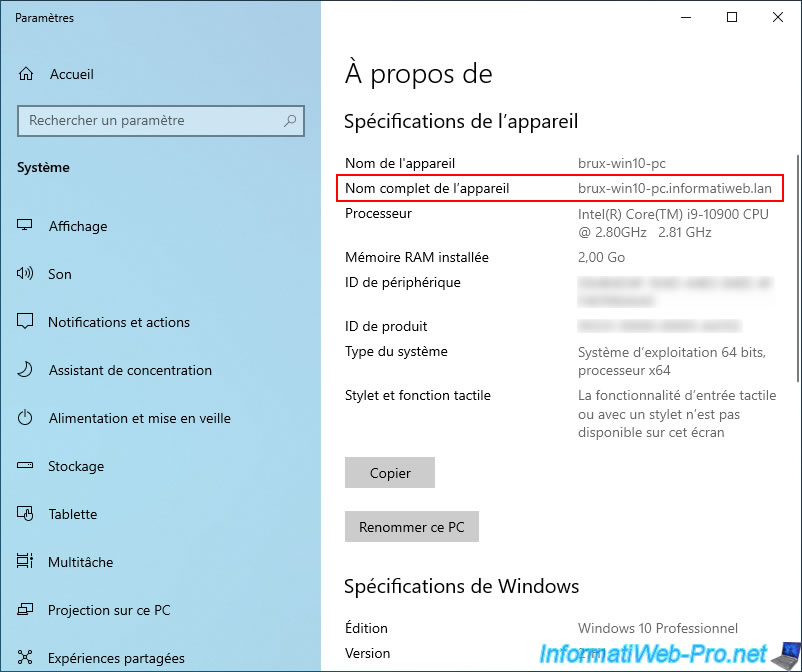
As expected, our computer "brux-win10-pc" is joined to our Active Directory domain "informatiweb.lan".
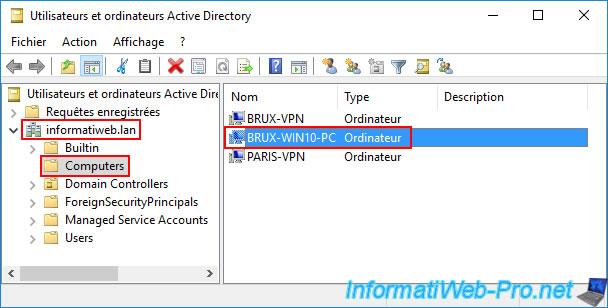
On one of your local domain controllers (in our case: brux-dc1), you will see that the corresponding computer account "BRUX-WIN10-PC" has been created in the "Computers" folder.
14.2. Join a Windows 10 client computer to your Active Directory domain at site 2 (Paris)
Similarly, at the remote site (Paris), open the "Network Connections" setting on your Windows 10 client computer.
As you can see, the network configuration of this computer is similar to that of the computer located in Brussels.
The main difference is the use of the "10.0.2.X" (Paris) network instead of "10.0.1.X" (Brussels).
Again, this computer will contact a local AD domain controller (located in Paris this time), since the DNS servers used are those in Paris: 10.0.2.11 (paris-dc1) and 10.0.2.12 (paris-dc2).
As you can see, this time this computer is named "paris-win10-pc".
Join this computer to the same domain (knowing that the domain is unique for the 2 sites, they are not 2 different domains).

As expected, your computer "paris-win10-pc" is now a member of your AD domain.
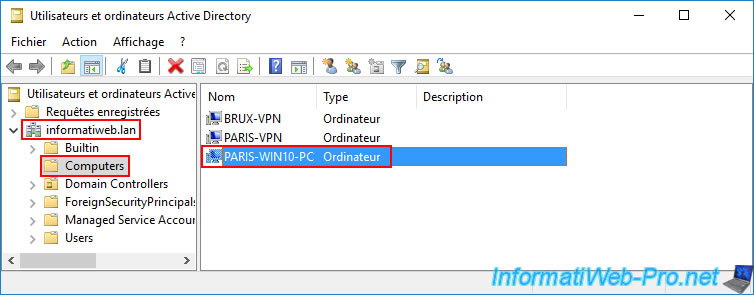
On a Paris AD domain controller, open the "Active Directory Users and Computers" console and navigate to the "Computers" folder.
As expected, you can see that the corresponding computer account "PARIS-WIN10-PC" has been created there.
Note: you may have noticed that the "BRUX-WIN10-PC" computer account seen previously does not appear here, even though we are accessing the same Active Directory domain.
Again, this is due to the fact that Active Directory data replication is not instantaneous. Therefore, the "BRUX-WIN10-PC" computer account is currently only located on the Brussels site, and the "PARIS-WIN10-PC" computer account is currently only located on the Paris site.
14.3. Force replication of computer accounts to other Active Directory domain controllers
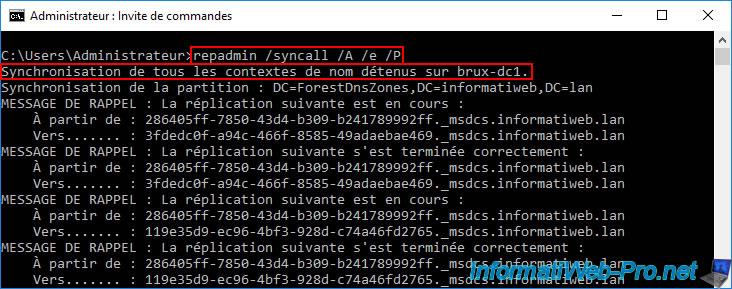
As explained previously, to ensure that the created computer accounts appear on all your Active Directory domain controllers (including the remote site), you simply need to use the "repadmin..." command on each AD domain controller where these computer accounts were created.
In our case, we replicated the data from our "brux-dc1" server at Site 1 (Brussels) so that the "BRUX-WIN10-PC" computer account would be automatically replicated to the other Active Directory domain controllers (including the remote site).
Batch
repadmin /syncall /A /e /P
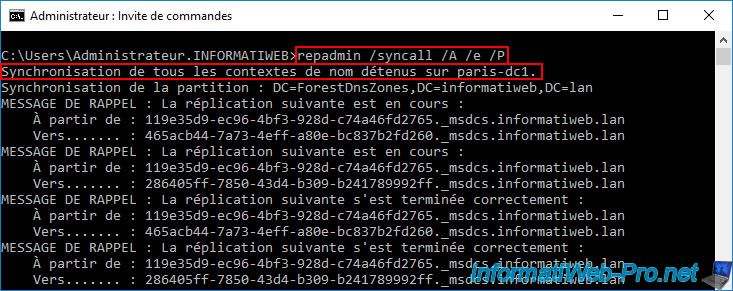
Same on the server "paris-dc1" of site 2 (Paris) for the computer account "PARIS-WIN10-PC".
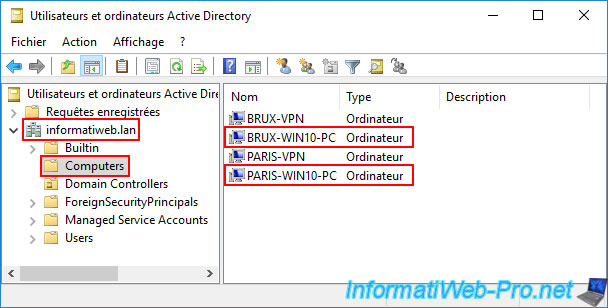
Refresh the "Active Directory Users and Computers" console if it's already open, and you'll see that your two new computer accounts, "BRUX-WIN10-PC" and "PARIS-WIN10-PC," now appear on all your domain controllers.
This is preferable, especially to avoid random authentication issues (due to a computer account that hasn't yet been replicated to the domain controller that was used for authentication at the time).
Share this tutorial
To see also
-

Windows Server 4/16/2021
Windows Server - AD DS - How Active Directory replication works
-
Windows Server 4/30/2021
Windows Server - AD DS - Overview of Active Directory functional levels
-

Windows Server 4/3/2021
Windows Server - AD DS - The basics of Active Directory
-

Windows Server 5/21/2021
WS 2016 - AD DS - Add a domain controller to an existing AD domain
No comment