- Windows Server
- DHCP
- 28 April 2012 at 13:06 UTC
-

Exceptionally, before starting the tutorial, we will first change the server's IP for the IP we give it's in the same range of IP address that clients will receive IP from your DHCP server.
Windows Server 2003 End of Support
Windows Server 2003 is no longer supported by Microsoft since July 2015.
We therefore recommend that you upgrade to a more recent version, such as : Windows Server 2012.
To create a DHCP server on Windows Server 2012, refer to our "Create a DHCP server on Windows Server 2012" tutorial.
Important :
- So that your customers receive only IP from your DHCP server, you must have your server and your clients are connected to a switch and NOT a router. If you want to use a router, you need to disable the DHCP and routing functions (NAT).
- If you want your clients to access the Internet, you need at least two network cards. One connected to the switch and the other an other switch (or a router or a modem) where there is Internet.
To do this, go to : start menu -> Control Panel -> Network Connections and right-click on "Local Area Connection".
For the tutorial, we will create a range of IP addresses of class A (10.x.x.x).
Here is the configuration of the Local Area connection that we will put :

Summary :
- Server IP (internal network side of the Switch) : 10.0.0.1
- The gateway 10.0.0.0 doesn't exist but it's just not leave the box blank and be in the same IP class.
To install a "DHCP Server", you must first click on "Add or remove a role" in the "Manage Your Server" window.


Select "DHCP Server" and click "Next".


Windows installs the "DHCP" component. You may need the CD "Windows Server 2003" to install it.

The wizard for creating a new scope appears.

Enter a name and description for your scope.

Set an IP address range for this scope. Clients will receive an IP from the beginning IP address and to the end of the scope.
Note : It's advisable to make a small range and expand later if needed because it's more difficult to reduce it. Simply because if you have a customer connected with 10.0.0.10 and the other with 10.0.0.50, you can't reduce it without causing disconnection because they are at the ends of the range set here.
For the subnet mask, it configures itself when you specify the IP range.

Add an IP range to exclude if you wish. If you want to exclude a single IP, indicate the same IP in the two cases.
IP excluded will not be distributed by DHCP. This can be used when a network device (computer, printer, ...) has a static IP address that is in the IP range that you just defined and so it avoids getting the following message: Conflict of detected on the network IP address. When this occurs the two devices lose access to the network and thus to the Internet.

The lease is the time that the server will remember what IP was given to any network device (identified by its MAC address is a unique physical address (except in the case of virtualization where you can change it)).
Once the lease expired, the network device will get a different IP than it had before where even if the chance is that the DHCP forwarding him the same.
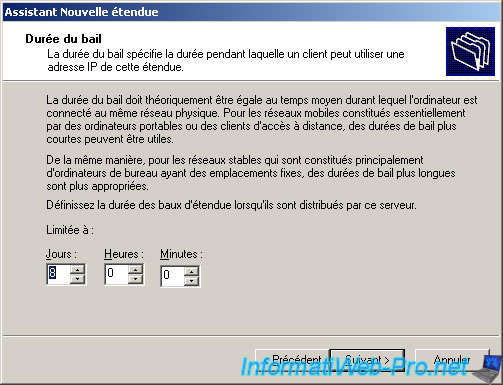
Leave checked the box "Yes, I want to configure these options now".

For now, leave this box blank. We will configure this after adding the second NIC.

The parent is the domain name you specified when creating the Active Directory.
For the DNS server, specify the IP address of your server 2003 (internal network side).

The WINS server translates NetBIOS names to IP addresses and vice versa.

Leave the box "Yes, I want to activate this scope now" checked and click "Next".

Once the wizard is complete, click "Finish".


Then, in the "Manage Your Server", click "Manage this DHCP server".

Right click on your DHCP server (as in the picture) and click "Allow".

Restart your 2003 server for the changes to take effect and then connect a Windows PC to your switch and go to Control Panel -> Network Connections and right-click on the Local Area Connection.
If your connection to your LAN client is automatic (default) you should get a 10.x.x.x IP address as image.
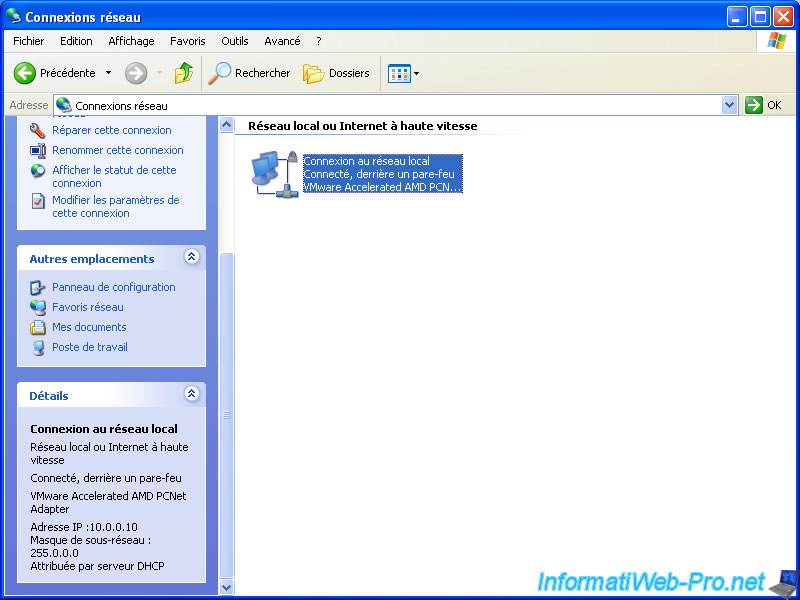
If this is not the case right click on "Local Area Connection" -> Properties. Select "Internet Protocol (TCP / IP)" and click the "Properties" button just below.
Then "Properties of Internet Protocol (TCP / IP)" opens. Verify that the 2 boxes "Obtain an IP address automatically" and "Obtain DNS server address automatically" are checked. If this isn't the case, select them and click "OK".

Then, on the server, return to the DHCP server by clicking "Manage this DHCP server".
Made a click on "Address Leases" to verify that your client PC has received an IP from your DHCP server and not another. If a line is added as the image is that your DHCP server is working properly and that your client received an IP from the DHCP server.
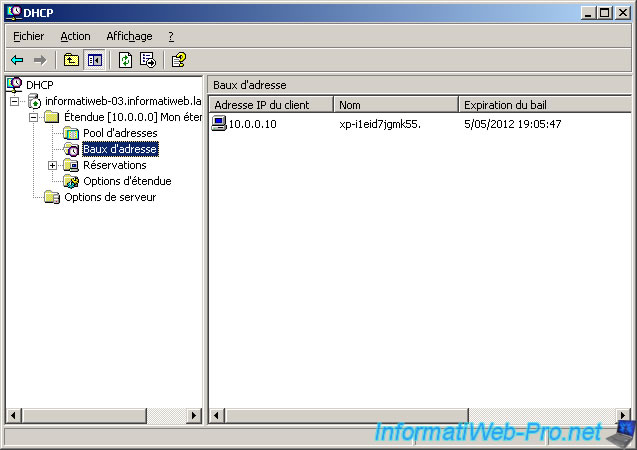
Now your clients get an IP from your DHCP server and the network operates between the server and clients but against your clients don't access internet which is quite annoying these days.
In fact you often know as the Box, LiveBox, ... are actually a network device that combines several things.
Box possess these features :
- Modem : with ID that allow you to have Internet at home.
- Router : that routes packets from the Internet to the PC on your network that has requested and vice versa, when a PC sends a file to the Internet, the router route the file (consisting of packets) to the Internet. Router functionality therefore used only when there are at least 2 PC in the same house who want to access the Internet.
The router also has a built-in DHCP server where the utility of the disabled and the NAT functionality for this tutorial works with router instead of the switch as you recommended in the beginning.
- Switch : is used to connect the PC network together. It's like a strip.
If you install this DHCP server on a server acting as a gateway, you must install the routing and NAT roles to allow your users to access the Internet : Windows Server 2003 - NAT and network routing.

You must be logged in to post a comment