Create a PXE server with a custom menu on Windows Server
- Windows Server
- PXE
- 12 August 2012 at 14:01 UTC
-

- 2/2
Let the open and go to the start menu "System" window -> Administrative Tools and click on "DHCP".

Right click on "server option" and click "Configure Options ...".

Check the box "66 - Hostname boot server" and enter either the computer name displayed in the "System" window, either its LAN IP address.

Check the box "67 - Boot Filename" and specify the path of the boot file. In our case, this is the "pxelinux.0" file that will serve boot file. The path of the file relative to the TFTP server root is "/boot/pxelinux.0".

4. Menu
Go to the "pxelinux.cfg" folder and create a new text file named "default.txt".

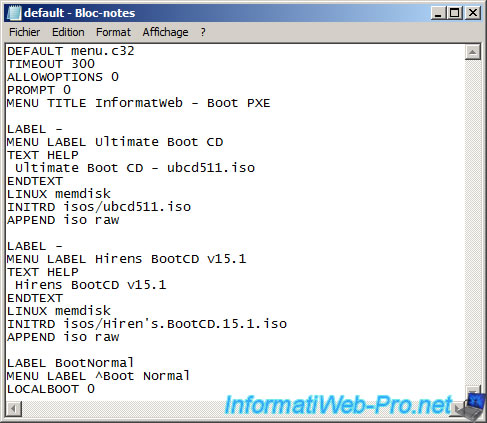
Open this document and paste this inside the file :
Plain Text
DEFAULT menu.c32
TIMEOUT 300
ALLOWOPTIONS 0
PROMPT 0
MENU TITLE InformatWeb - Boot PXE

LABEL -
MENU LABEL Ultimate Boot CD
TEXT HELP
Ultimate Boot CD - ubcd511.iso
ENDTEXT
LINUX memdisk
INITRD isos/ubcd511.iso
APPEND iso raw

LABEL -
MENU LABEL Hirens BootCD v15.1
TEXT HELP
Hirens BootCD v15.1
ENDTEXT
LINUX memdisk
INITRD isos/Hiren's.BootCD.15.1.iso
APPEND iso raw

LABEL BootNormal
MENU LABEL Normal ^boot
LOCALBOOT 0
Explanations on the general options :
- The line with "default menu.c32" activates the simple sytem menu.
- The line "timeout 300" set a countdown of 30 seconds. This time is in tenths of seconds.
- The line "Allowoptions 0" set if the options are listed on the command line or not. 0 if they are not admitted.
- The line "prompt 0" suppresses the display of the traditional "boot".
- The line "title menu" set the menu name displayed at the top of the screen.
Explanation of the different types of bootable items to add to the menu :
- For iso files for example, the syntax is as follows :
Plain Text
LABEL -
MENU LABEL Element Name
TEXT HELP
Element Description
ENDTEXT
LINUX memdisk
INITRD path/of/the/.iso/file
APPEND iso raw
- For img files (disk image), the syntax is :
Plain Text
LABEL -
MENU LABEL Element Name
TEXT HELP
Element Description
ENDTEXT
LINUX memdisk
INITRD path/of/the/.img/file
APPEND raw
- To boot from the local hard drive, the syntax is :
Plain Text
LABEL BootNormal
MENU LABEL ^Boot Normal
LOCALBOOT 0
Info : The character ^ before a letter of an item defined the key to press to select the desired item.
For other types of files, you find the syntax on the publisher's website (sylinux) or on the website of "Ultimate Boot CD" that also uses the system syslinux.

Once saved the text file, rename it by Windows Explorer to "default" without extension.

With no extension, type changes to "File" with nothing behind.

We will create a "isos" folder (or whatever name you want) to put our iso files of "Ultimate Boot CD" and "Hiren Boot CD". These 2 Bootable CD we offer in this tutorial are of course examples of Boot CD very useful and known very well but you can put other Live CD as Win PE, Bart PE, ...

Here is an overview of the two iso files.

5. PXE boot
On the client computer, enter the BIOS by pressing "DEL" or "F2" at startup. Go to the Boot tab and set the "Network Boot" line or "PXE" first. The name and appearance changes according to the motherboards BIOS. There are, for example, "PhoenixBIOS" like the picture, AMI BIOS, Award BIOS, ...

Then, save the changes and exit the BIOS.


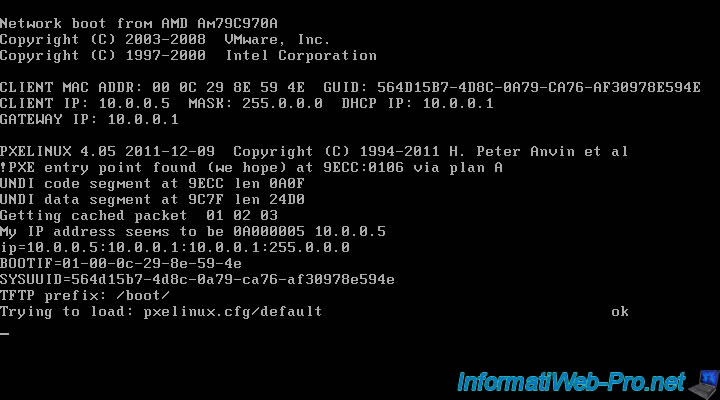
If your BIOS is configured correctly, you should have a screen like this for a moment.
As you can see in this picture (it may be that you do not have time to see it because the load can be very fast), the client computer receives an IP address, a subnet mask, a gateway can be used for Internet with a Bart PE CD or mini XP Hiren Boot CD for example. He then receives the address of your TFTP server from which it will download the boot file and the file menu.

When you start the computer you will have a menu like this. Select the Bootable CD which start (or bootable diskette ... depending on what you've added in the menu) and press "ENTER".

Once you press this button, the client computer will download the file that corresponds to what you have chosen and the extract in RAM. The number of "." varies depending on the file size.

Because we selected "Ultimate Boot CD", it is the screen of "Ultimate Boot CD".

If you go on your server in the history of your TFTP server, you will see something like the picture. This history can also help you deal with some errors in the PXE because if a file isn't found, for example, you can see where he was trying to get well and solve this problem.

Note : If you want to install Windows over the network, you must use WDS appeared since Windows Server 2008. Warning : You can't use your custom PXE menu because WDS uses his system of PXE

Show comment