- Linux
- 31 December 2016 at 12:53 UTC
-


When you work in a business, it is common to use a server (under Windows Server or Linux) as a router, including to perform filtering or for another reason.
Then, when you create a gateway, you also install a DHCP server to automatically distribute IP addresses to client PCs. This can be done with a physical device or a program installed on a server.
In our case, our Linux server will act as a gateway (router) and a DHCP server.
Configuration used :
- a server on Linux (Debian 7.7.0 x64) with 2 network cards. The 1st connected on the WAN (external) and the 2nd on the LAN (internal).
- a client on Windows, Linux or other. In our case, we used a PC under Windows 7.
- Configure network interfaces
- Install and configure a DHCP server
- Assigning a static IP address to a machine
- Turn your Linux server into a router
- Port routing
- Test the configuration
1. Configure network interfaces
To begin, you must configure the 2 network interfaces (network adapter) of your Linux server.
- On the WAN side (eth0 in our case), the Linux server will have a static IP address (depending on the IP class of the WAN).
- On the LAN side (eth1 in our case), the Linux server will have a static IP address that will match the IP class of the DHCP server existing on the LAN or of the DHCP server that we will install under Linux.
In our case, we will use :
- a C class for the WAN : 192.168.x.x
- a A class for the LAN : 10.x.x.x
To set a static IP address, refer to one of these tutorials:
Here is our network configuration for the WAN static IP (/etc/network/interfaces).
Note : don't delete the lo interface (loopback).
Plain Text
auto eth0
iface eth0 inet static
address 192.168.1.10
netmask 255.255.255.0
gateway 192.168.1.1
And our DNS configuration (/etc/resolv.conf).
Note : these are public DNS servers of Google.
Plain Text
nameserver 8.8.8.8
nameserver 8.8.4.4
Then, for the LAN interface, you will need to use a network ID.
In our case, our Linux server will have :
- a "10.0.0.254" IP address on the LAN side. This is the address that clients should specify as the default gateway.
- a "255.0.0.0" subnet mask (class A as the IP address mentioned above)
- a "10.255.255.255" broadcast address (this is a reserved IP address recognizable to the values : 255)
- and a "10.0.0.0" network ID (recognizable by the values 0 indicated at the end)
Plain Text
auto eth1
iface eth1 inet static
address         10.0.0.254
netmask         255.0.0.0
broadcast       10.255.255.255
network         10.0.0.0
Finally, reboot the machine to save changes.
2. Install and configure a DHCP server
When you configure a server to act as a gateway, you usually install a DHCP server on that same server.
Indeed, machines on the LAN must have an IP address to communicate with your gateway and therefore have access to the Internet.
If your Linux server and clients are plugged into a switch, you will also need to install the DHCP server on your Linux server or on a server on the LAN.
In our case, we will install a DHCP server under Linux.
To do this, install the "isc-dhcp-server" package.
Note : isc-dhcp-server is the replacement for dhcp3-server. In addition, if you attempt to install the "dhcp3-server" package, you will see that Linux will automatically choose to install the "isc-dhcp-server" package.
Bash
apt-get install isc-dhcp-server
At the end of the installation, you will see that the attempt to start the DHCP server will cause an error.
If you look in the file "/var/log/syslog", you will see that this error is due to the non-configuration of the "dhcpd.conf" file.
Plain Text
Oct  7 13:20:19 debian dhcpd: No subnet declaration for eth1 (10.0.0.254).
Oct  7 13:20:19 debian dhcpd: ** Ignoring requests on eth1.  If this is not what
Oct  7 13:20:19 debian dhcpd:    you want, please write a subnet declaration
Oct  7 13:20:19 debian dhcpd:    in your dhcpd.conf file for the network segment
Oct  7 13:20:19 debian dhcpd:    to which interface eth1 is attached. **
Oct  7 13:20:19 debian dhcpd:
Oct  7 13:20:19 debian dhcpd: Not configured to listen on any interfaces!
To resolve this issue and configure your DHCP server, you will need to modify the file "/etc/dhcp3/dhcpd.conf" or "/etc/dhcp/dhcpd.conf" (depending on your Linux distribution and version).
Bash
vi /etc/dhcp/dhcpd.conf
In this file, you will find several important information.
The domain (or "Connection-specific DNS Suffix" under Windows).
This is the local domain name on your network.
Setting this value is useful if you have an Active Directory server on your local network, for example.
Plain Text
option domain-name "informatiweb.lan";
Then, you can specify which DNS servers your clients will use.
Either, you specify Google's public DNS servers, either your Internet Service Provider (ISP) DNS servers or your gateway's IP address if you intend to install a DNS server on it (for example, BIND).
In our case, our customers will use Google's public DNS servers.
Plain Text
option domain-name-servers 8.8.8.8, 8.8.4.4;
Finally, you will have to define:
- an IP address range for your LAN (internal) : range x.x.x.x x.x.x.x;
- and the IP address of the gateway that your clients will use : option routers x.x.x.x;
Plain Text
subnet 10.0.0.0 netmask 255.0.0.0 {
   range 10.0.0.10 10.0.0.20;
   option routers 10.0.0.254;
}
Note that by default, the lease (validity period of IP addresses will be 7200 seconds, so 2 hours.).
To change the length of validity of IP addresses, modify these lines :
Plain Text
default-lease-time 600;
max-lease-time 7200;
Restart the DHCP server.
Bash
/etc/init.d/isc-dhcp-server restart
Note : If you still use the old "dhcp3-server" package and not "isc-dhcp-server", you will need to use this command:
Bash
/etc/init.d/dhcp3-server restart
3. Assigning a static IP address to a machine
With the DHCP server, you can automatically assign IP addresses to computers on your network.
However, a DHCP server can also assign the same IP address to a specific machine (for example : another server on the same network).
To do this, just add this for each static IP.
In this block you will specify :
- the name of the machine (in theory, this name is not verified) : my-server
- the MAC address of the machine : 01:23:45:67:89:01
- the IP address that this machine will get each time : 10.0.0.15
Note : to find the MAC address of a machine, use the command "ipconfig / all" on Windows or "ifconfig" on Linux.
Plain Text
host my-server {
   hardware ethernet 01:23:45:67:89:01;
   fixed-address 10.0.0.15;
}
4. Turn your Linux server into a router
Finally, we will enabling the packet routing on our Linux server so that it behaves like a router (a gateway).
To do this, edit the "/etc/sysctl.conf" file.
Bash
vi /etc/sysctl.conf
And uncomment the "net.ipv4.ip_forward=1" line.
Plain Text
net.ipv4.ip_forward=1
Then, edit the "/etc/rc.local" file.
Bash
vi /etc/rc.local
And add this before the "exit" line.
Bash
/sbin/iptables -P FORWARD ACCEPT
/sbin/iptables --table nat -A POSTROUTING -o eth0 -j MASQUERADE
Now, at each boot, these 2 lines will be executed and the Linux firewall will therefore accept to forward packets between your 2 network interfaces (network cards).
Restart your server to apply the changes.
Bash
reboot
Or type the two commands "/sbin/iptables ..." to avoid having to restart now.
5. Port routing
To forward ports under Linux and thus be able to access a local server from the outside (for example : from Internet), you need to add this in the "rc.local" file.
Note :
- eth0 : corresponds to the WAN interface (external / Internet) of your Linux server.
- informatiweb.no-ip.org : the external domain name, or the external IP address of your Linux server.
- dport : the external port (HTTP = 80 by default)
- to 10.0.0.2:80 : the IP address of the server on your internal network (LAN) and the port on which your server is listening. Here a webserver (Apache or IIS) which listens by default on the port 80 (HTTP).
Bash
/sbin/iptables -t nat -A PREROUTING -p tcp -i eth0 -d informatiweb.no-ip.org --dport 80 -j DNAT --to 10.0.0.2:80
6. Test the configuration
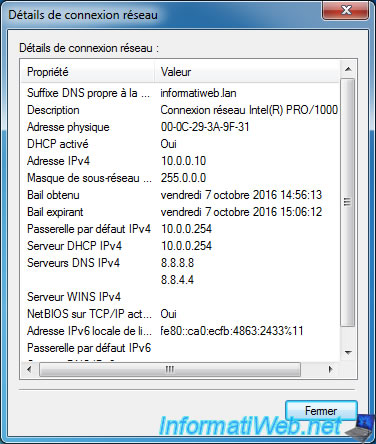
To test our configuration, we used a Windows client.
But it will work with any machine and any operating system (Windows, Mac, Linux, ...).
As you can see :
- the local domain name (optional) is : informatiweb.lan
- our client PC has received an IP address : 10.0.0.10
- the subnet mask is : 255.0.0.0
- the IPv4 address of the gateway (router) : 10.0.0.254
- the IP address of the DHCP server from which our client received an IP address is : 10.0.0.254
- and our client PC will use Google's DNS servers : 8.8.8.8 and 8.8.4.4
Share this tutorial
To see also
-

Linux 12/12/2014
Debian / Ubuntu - Configure a DNS server (BIND)
-

Linux 8/23/2016
PuTTY - Fix the issue with the numeric keypad
-

Linux 9/8/2016
StartSSL - Renew your SSL certificates
-

Linux 1/31/2014
Ubuntu - Update your server
You must be logged in to post a comment