- VMware
- 27 March 2024 at 14:57 UTC
-

- 1/2

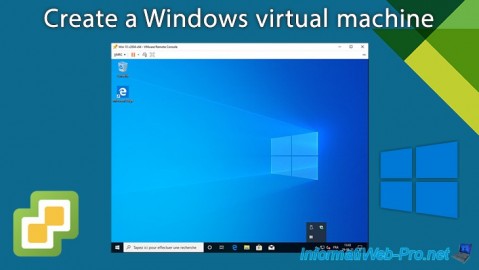
From the VMware vCenter Server (VCSA) web interface, you can create virtual machines with different operating systems.
In this tutorial, you will see how to create a virtual machine from your VMware vCenter Server (VCSA), but also how to install VMware Tools.
- Check compatibility of a guest operating system (Windows)
- Store the Windows guest OS iso file in a datastore
- Create a Windows virtual machine
- Start your Windows virtual machine
- Install VMware Tools on Windows
- Files making up the Windows virtual machine
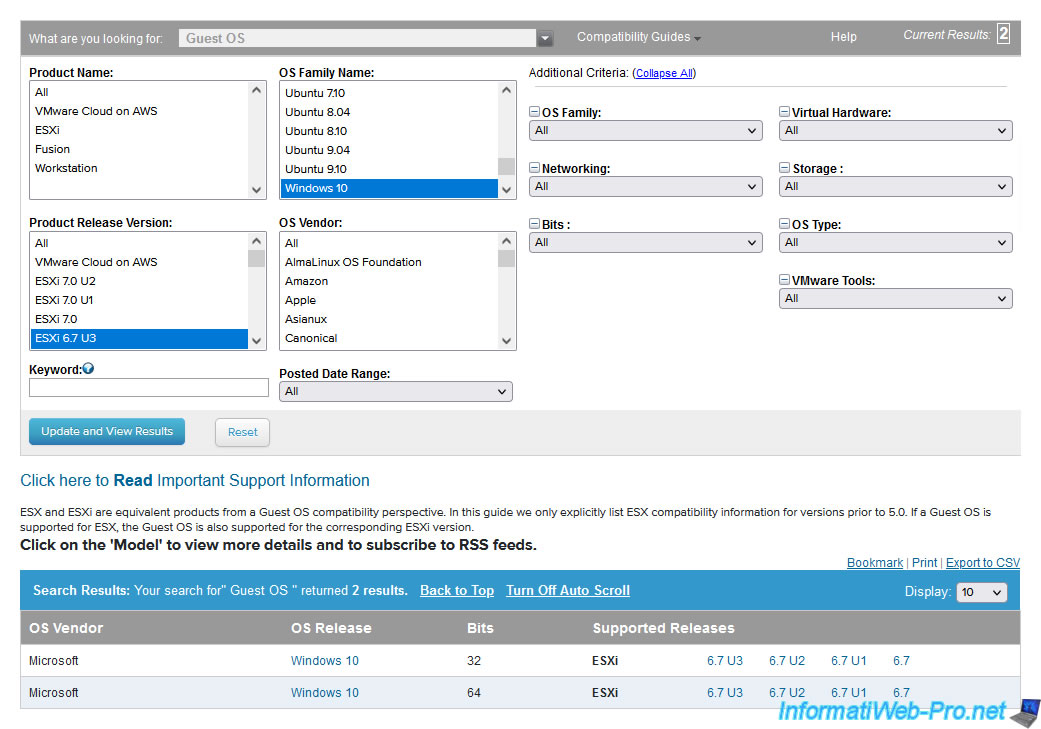
1. Check compatibility of a guest operating system (Windows)
For this tutorial, we will install Windows 10 as a guest operating system.
However, in production, you should ensure that the operating systems you install in your virtual machines are compatible with your version of VMware ESXi.
To do this, consult the VMware compatibility matrix by first selecting "Guest OS" at the top of the page.
Then select:
- OS Family Name: the guest operating system you want to install. In our case: Windows 10.
- Product Release Version: the version of your VMware ESXi hypervisor. In our case: ESXi 6.7 U3.
In our case, we can see that it's officially supported by VMware and therefore compatible.
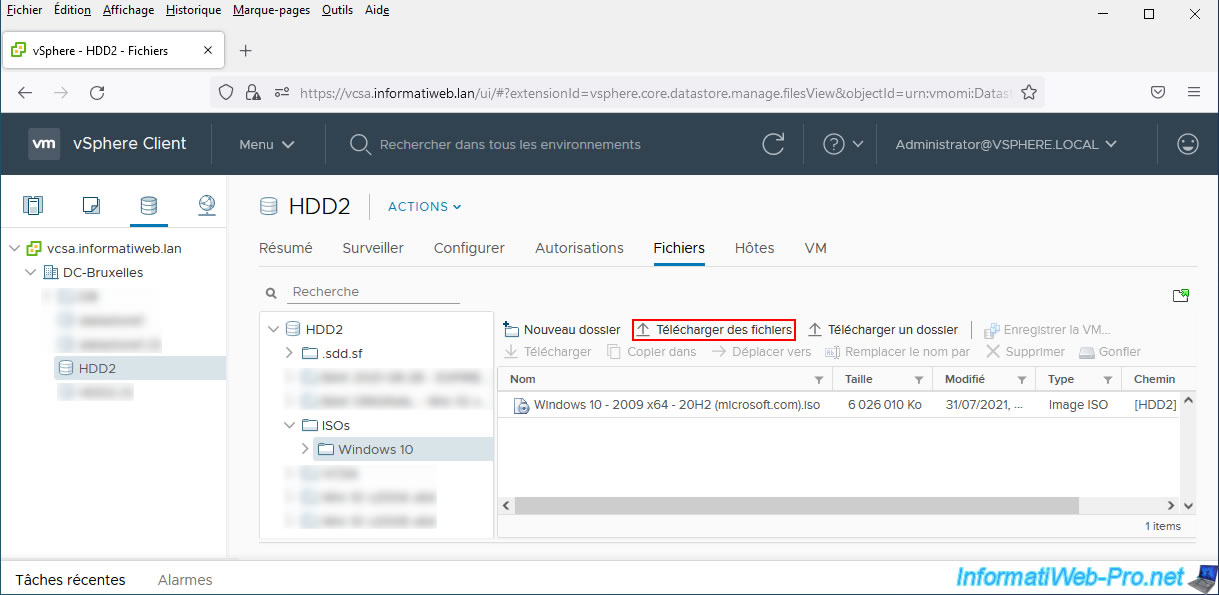
2. Store the Windows guest OS iso file in a datastore
Before creating your virtual machine, we recommend that you upload the desired guest operating system (Windows) ISO file to the datastore of your VMware ESXi hypervisor.
To do this, go to the 3rd tab (Storage), then go to the "Files" tab.
Then click: Upload Files.
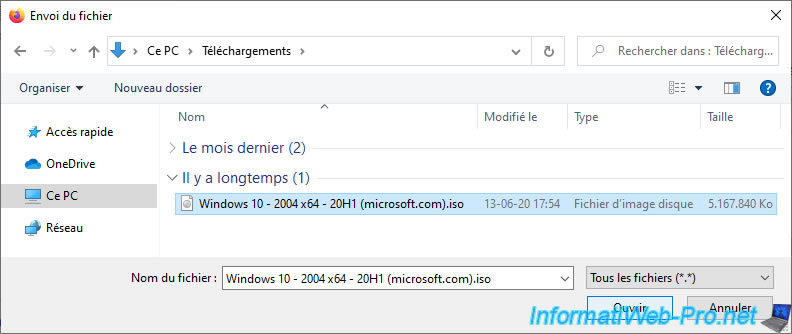
Select the desired guest operating system (Windows) ISO file and click: Open.
Wait while the ISO file is sent to your datastore.
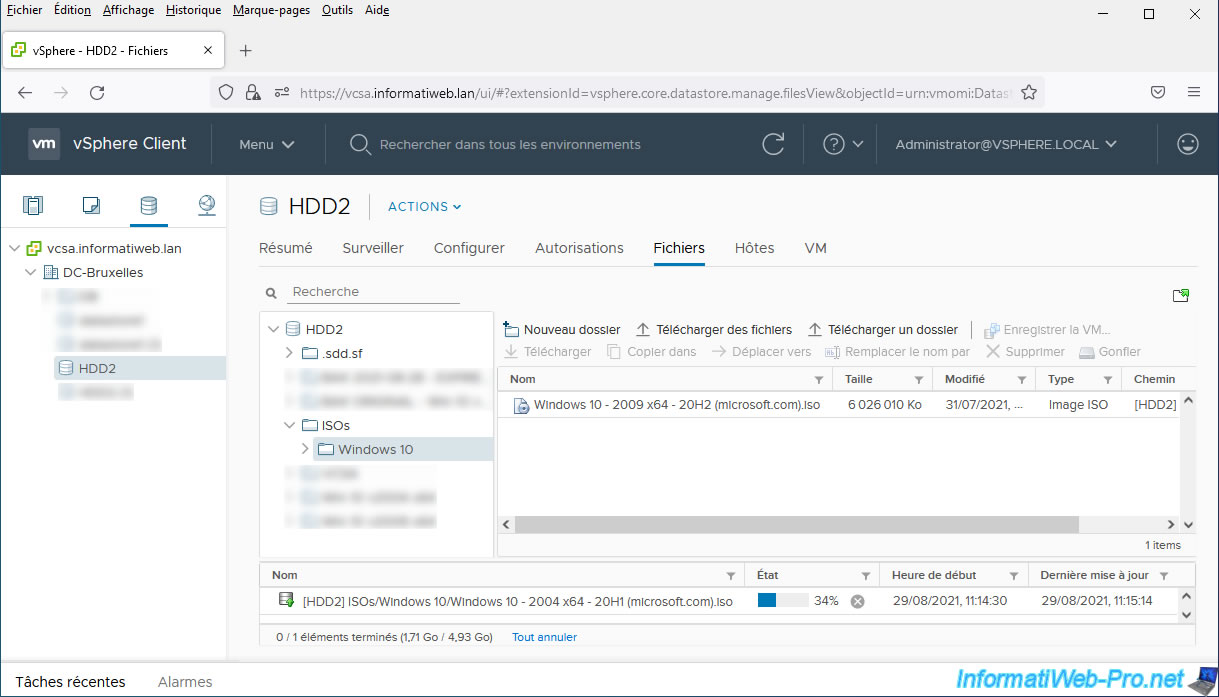
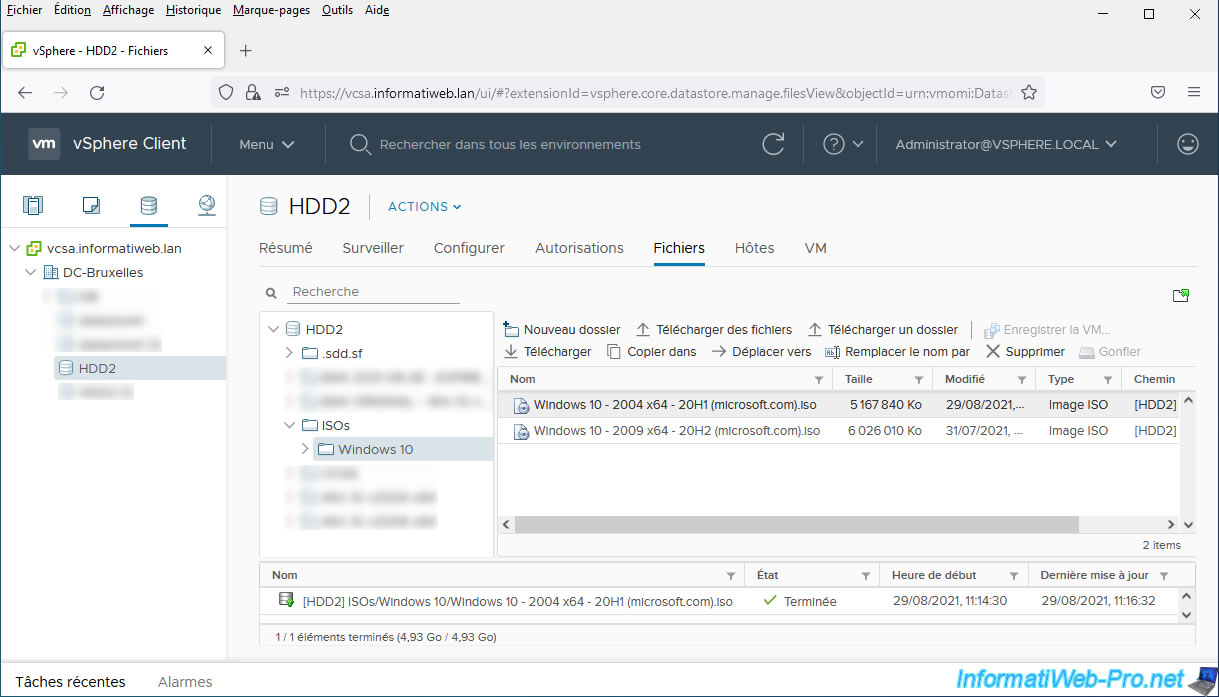
Once the ISO file is sent, the ISO file will appear in your datastore.
3. Create a Windows virtual machine
Go to the 2nd tab (VMs and Templates) and right-click "New Virtual Machine" on the location (datacenter or folder) where you want to create your virtual machine.
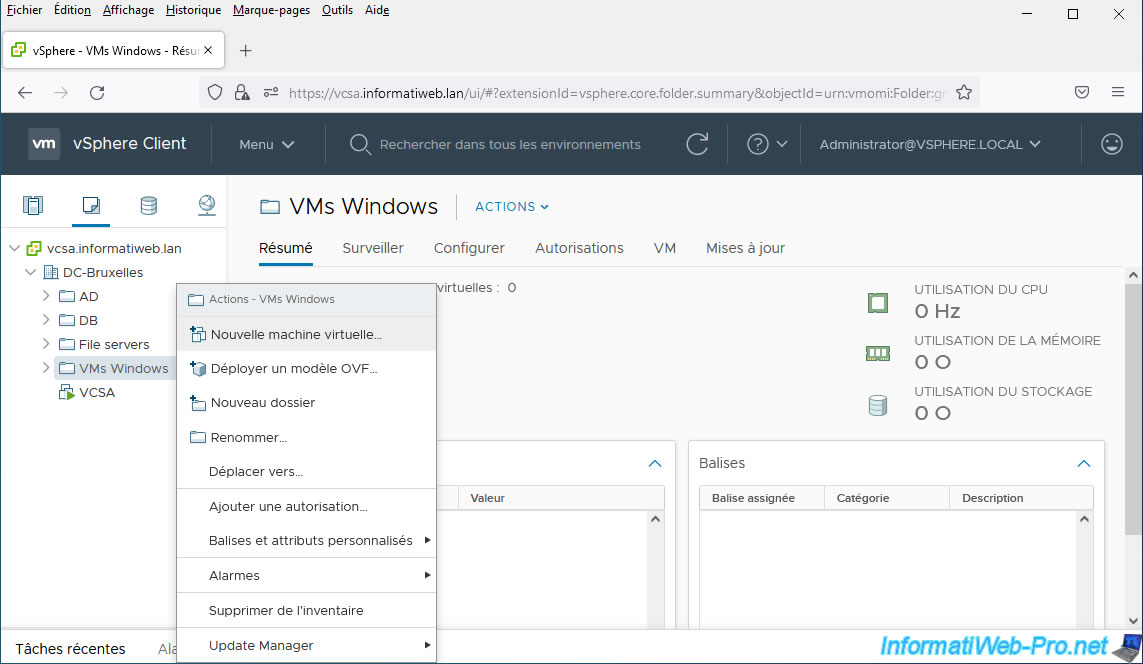
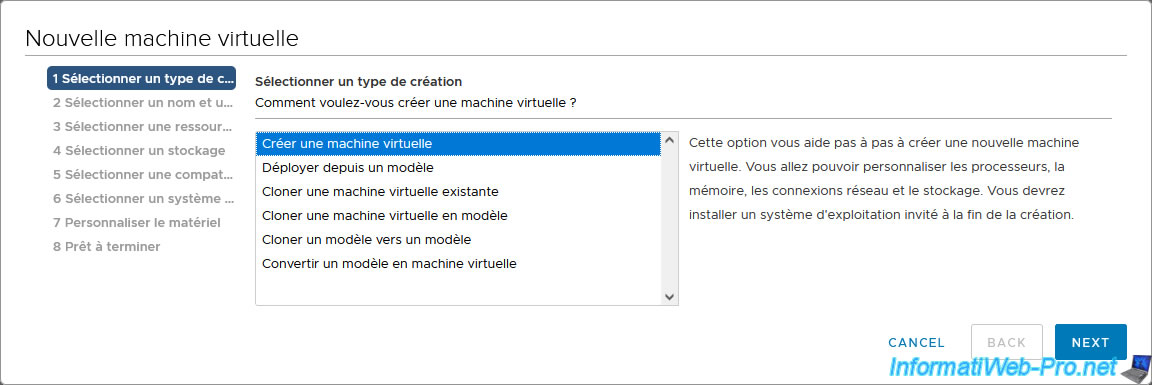
In the "New Virtual Machine" wizard that appears, select "Create a new virtual machine" and click: Next.
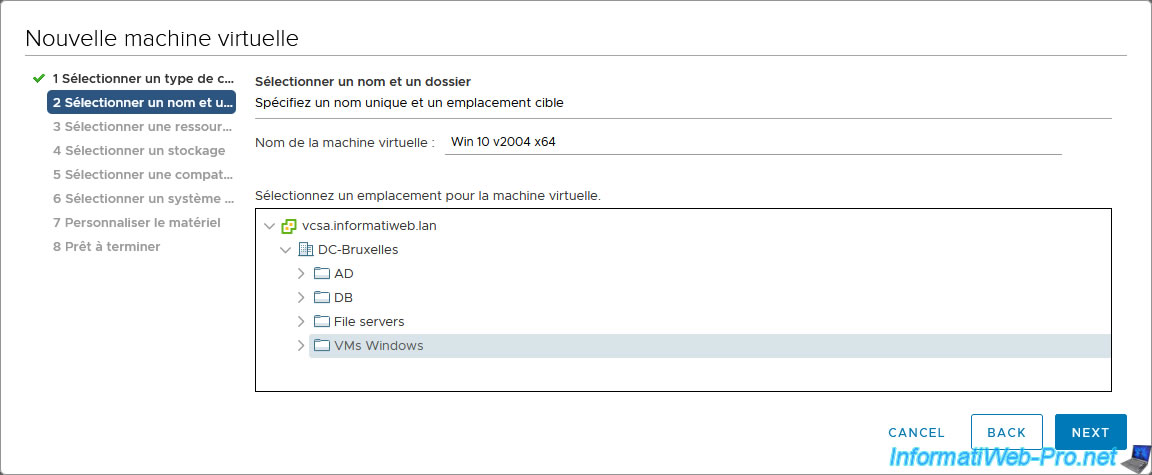
Provide a name for your new virtual machine and select where you want to store it.
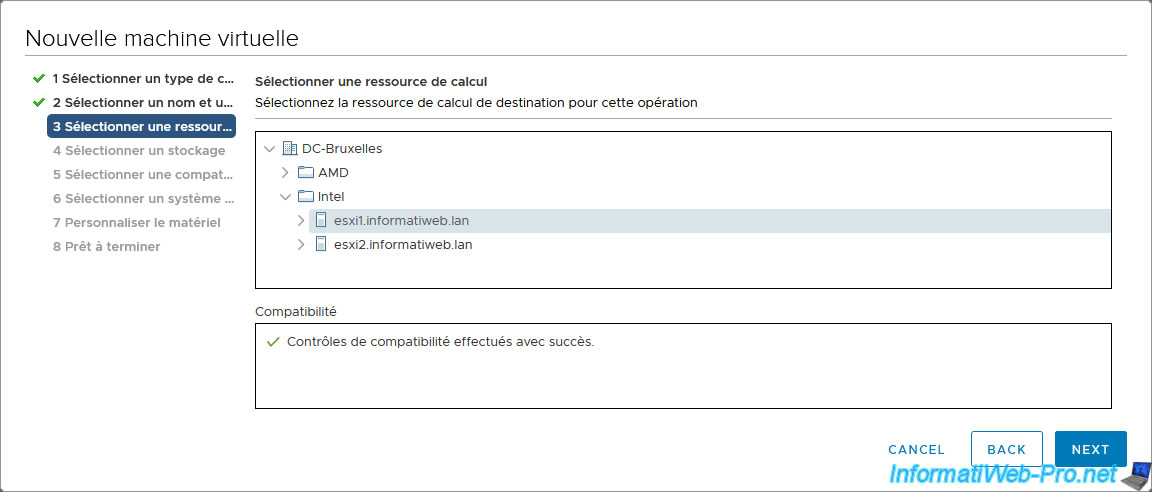
Select the compute resource (VMware vSphere / ESXi hypervisor) that will be used to run your virtual machine.
It is therefore the resources (processor and RAM) of this VMware vSphere server (ESXi) which will be used to run your virtual machine.
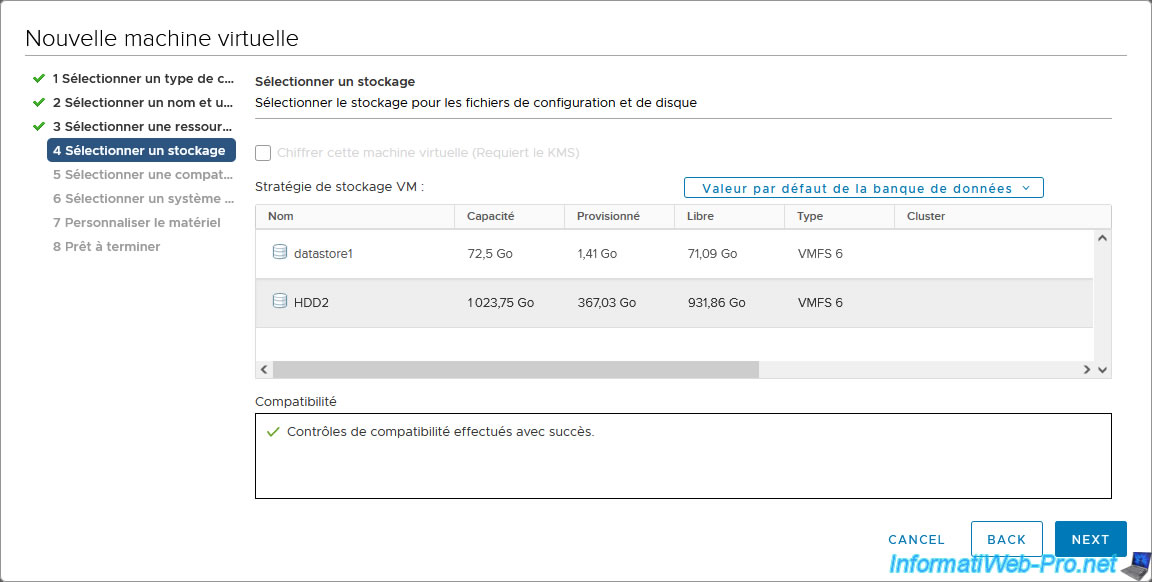
Select the datastore of your VMware vSphere hypervisor (ESXi) where you want to store this new virtual machine.
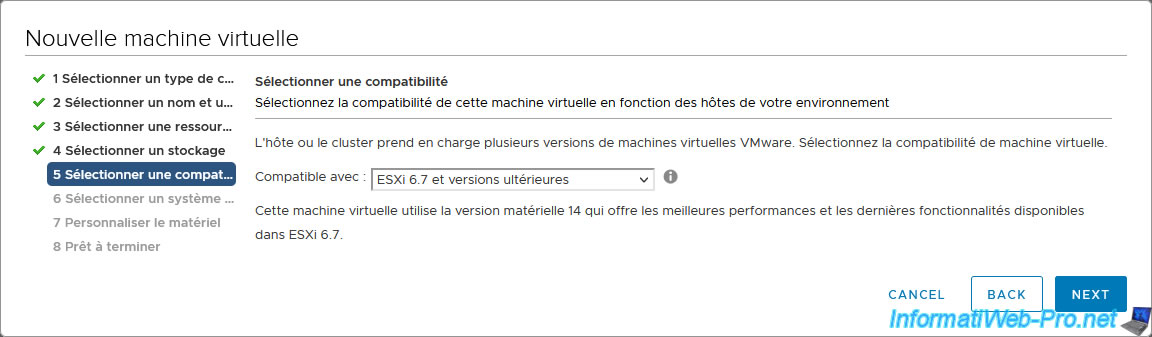
Select the compatibility level for this virtual machine.
By default, the selected version corresponds to the version of your VMware ESXi hypervisor.
This allows you to benefit from all the latest features supported by your version of VMware ESXi.
However, to ensure compatibility with other VMware products, you may one day choose a slightly older version.
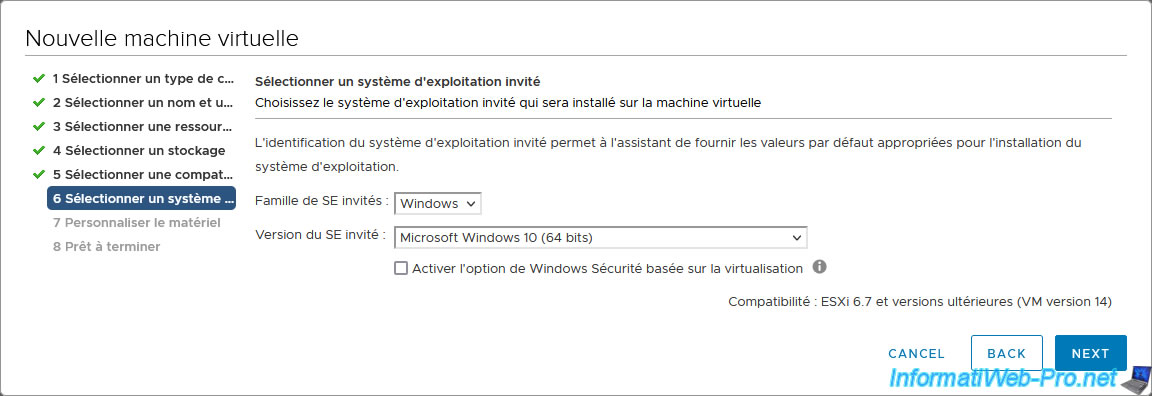
For the guest operating system to install in your virtual machine, select:
- Guest OS Family: the type of guest operating system you want to install. So: Windows, Linux or whatever.
In our case: Windows. - Guest OS Version: the desired guest operating system version.
In our case, the version of Windows we want to install: Microsoft Windows 10 (64 bits).
Then click Next.
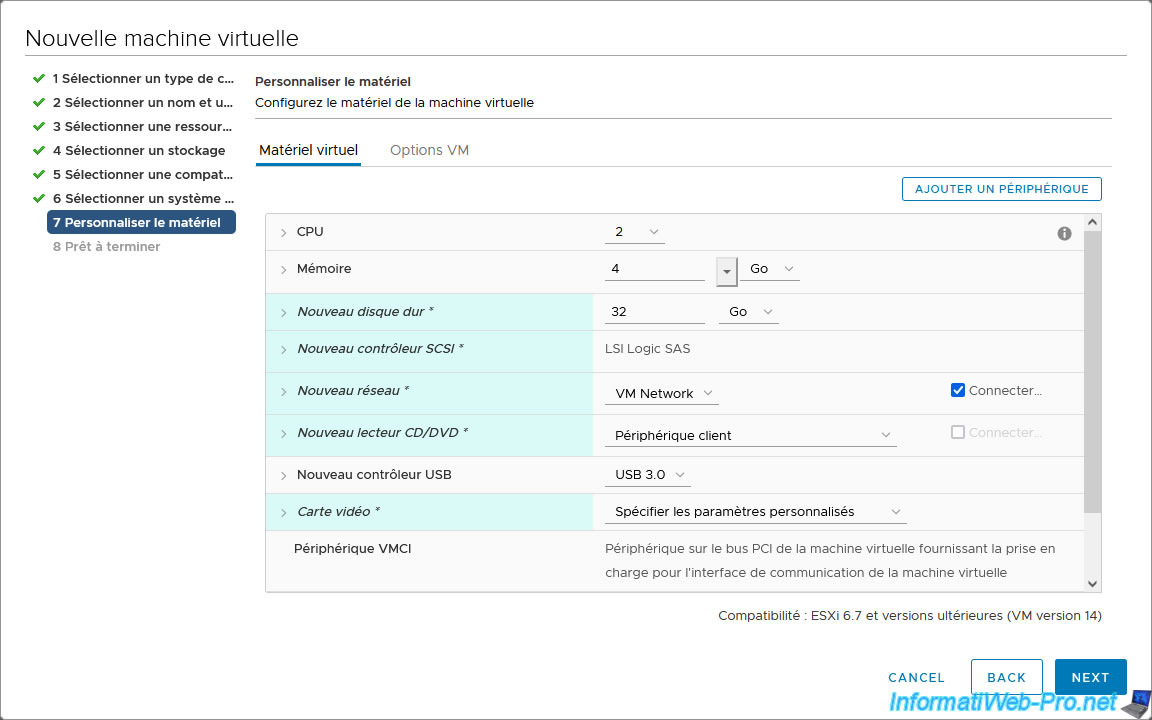
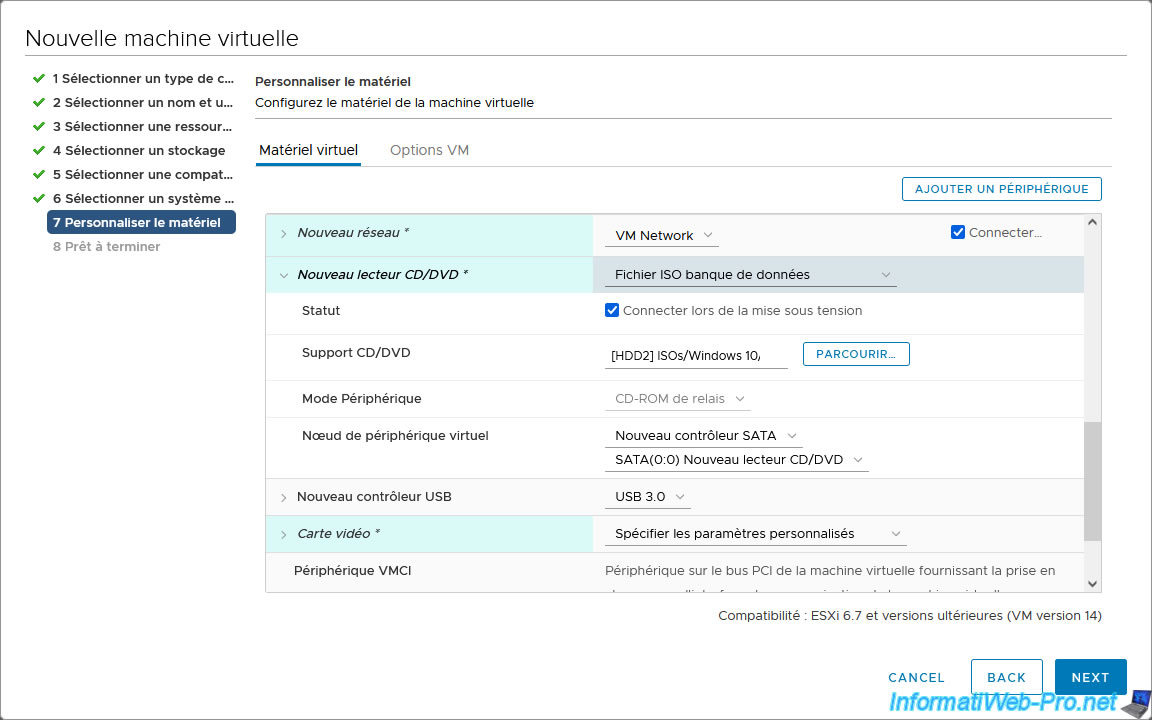
For virtual hardware, you will have the possibility of:
- CPU: adapt the number of processors and/or logical processor cores that will be visible to the guest operating system (depending on the processor of the VMware ESXi host).
- Memory: adapt the amount of host memory (RAM) that will be allocated to this virtual machine.
- New Hard disk: change the size of the virtual hard disk, choose between dynamic (to save disk space) or static (to increase performance) provisioning, ...
- New SCSI controller: change the type of SCSI controller that will be used by this virtual machine.
- New Network: change the virtual network that your VM will use on your VMware ESXi host
- New CD/DVD Drive: use the CD/DVD present in the CD/DVD drive of your VMware ESXi host or use an ISO file to install the guest operating system in the VM.
- New USB Controller: change the version to use for your VM's virtual USB controller. However, this choice is automatically adapted by VMware based on compatibility with the desired guest operating system.
- Video card: manually adjust the number of screens, the amount of video memory, ...
- VMCI device: system bus used by VMware so you can communicate with your virtual machine.
- New SATA Controller: virtual SATA controller added by VMware and to which the virtual CD/DVD drive of your VM is connected, by default.
- Other: additional virtual hardware automatically added for system reasons (such as a PCI controller, virtual keyboard, ...).
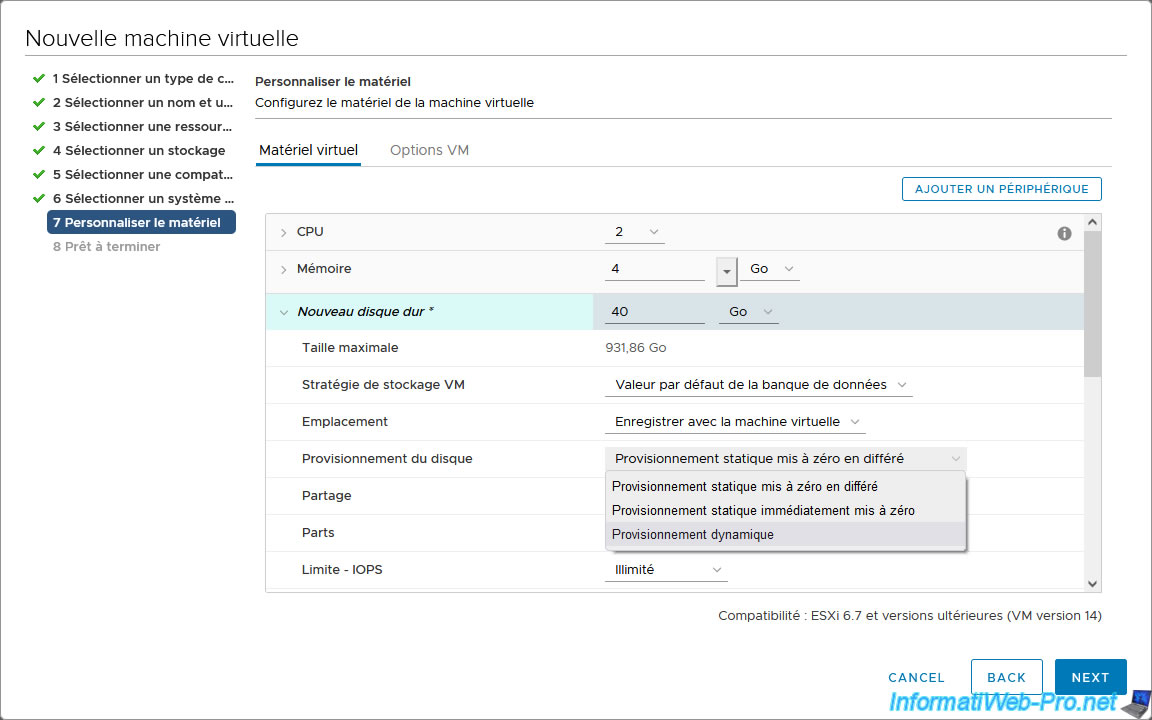
Expand the "New Hard disk" node and choose the disk provisioning type:
- Thick Provision Lazy Zeroed : allows you to directly allocate the desired maximum size for this virtual hard disk in the VMware ESXi host datastore.
This makes it possible to avoid the problem of overprovisioning. - Thick Provision Eager Zeroed: same as the previous option, but with the difference that all the blocks of the physical hard disk concerned by the allocation of storage space for this virtual hard disk will be zeroed during creation of it.
Which means that the creation of this virtual hard disk (and therefore of your VM) may take a long time depending on the maximum size desired for it. - Thin Provision: the virtual hard disk file on the host will only take up the space required for the data on it.
The file on this virtual hard drive will therefore grow as you store data in the guest operating system.
In a test environment, choose "Thin Provision" to save disk space.
Then, for the new virtual CD/DVD drive, select "Datastore ISO File".
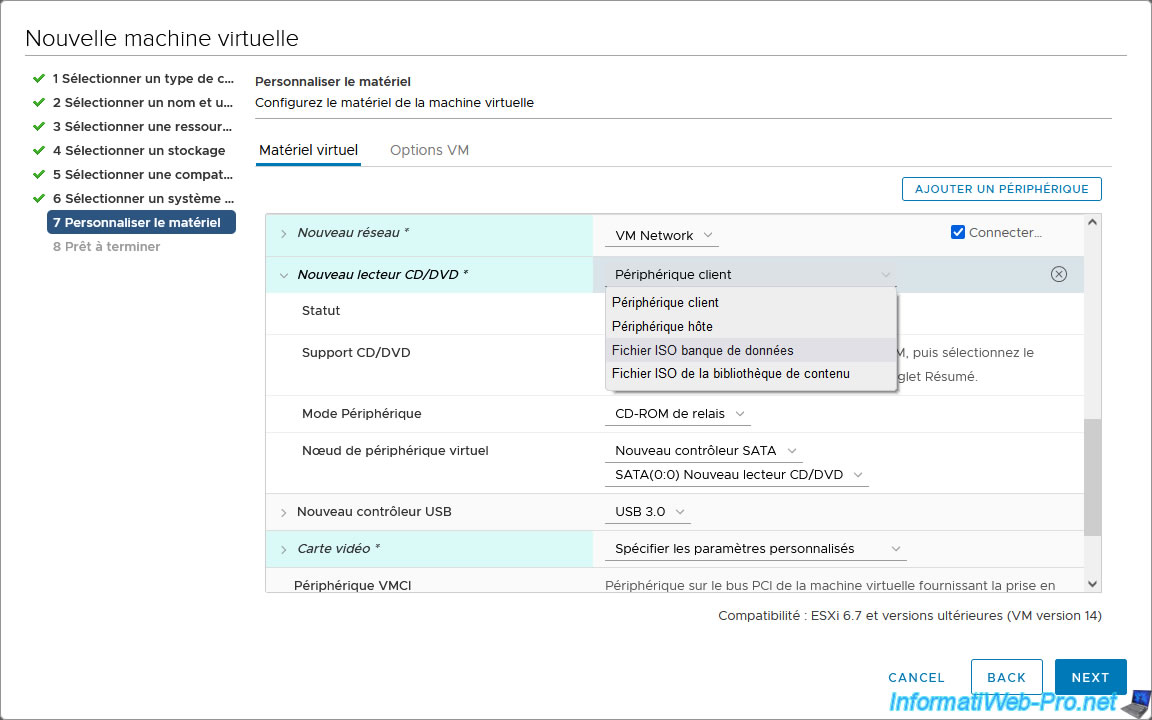
Select the desired guest operating system ISO file (previously stored in your VMware ESXi hypervisor datastore) and click OK.
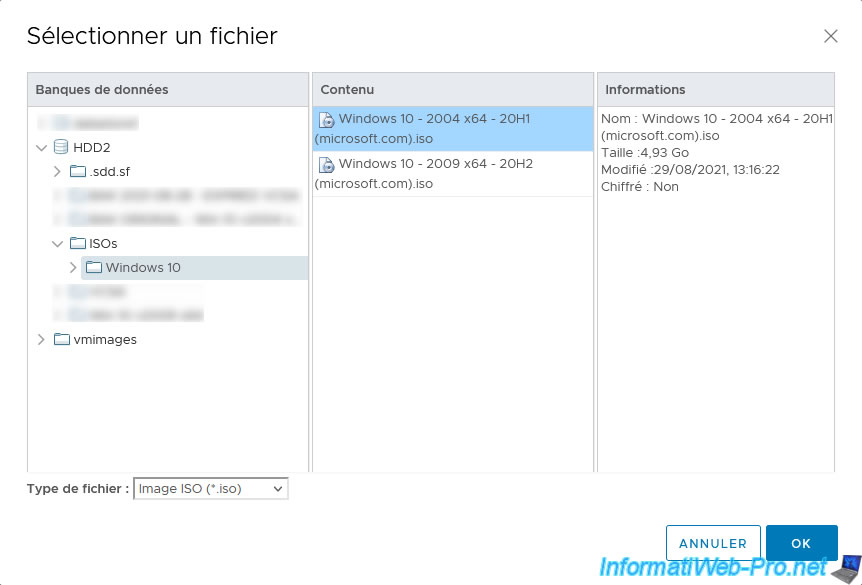
Make sure to check the "Connect At Power On" box for this virtual CD/DVD drive, otherwise your virtual machine will not be able to boot to the ISO file selected here.
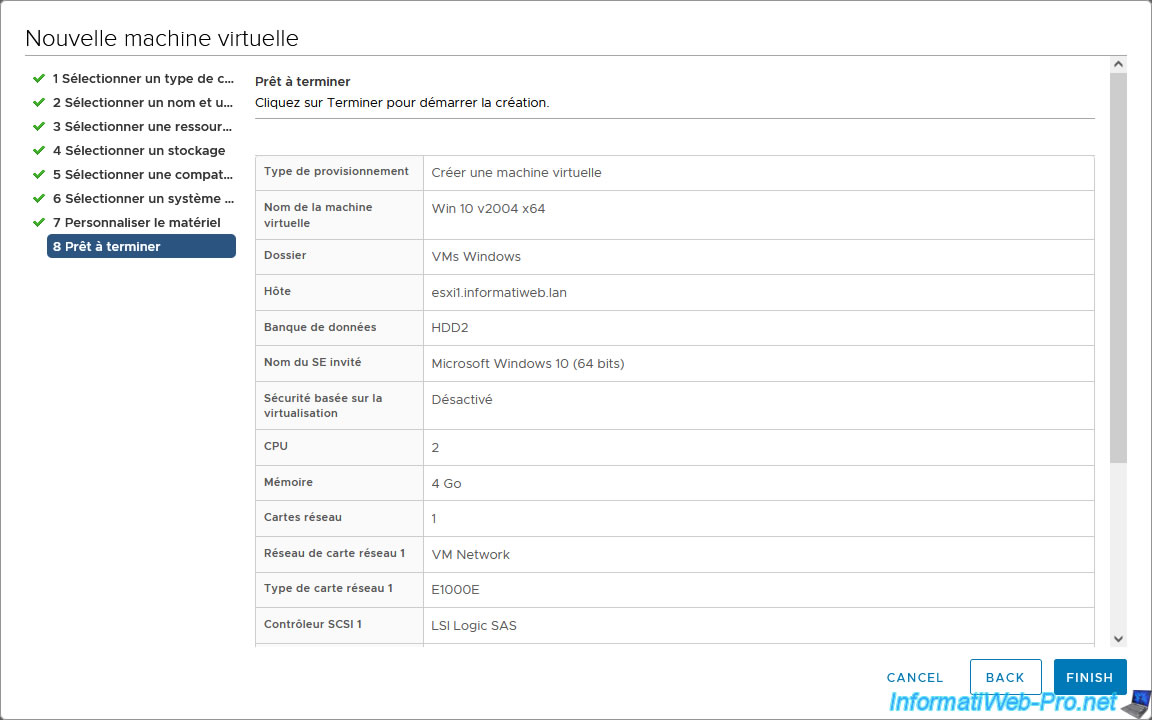
A summary of the configuration of your new virtual machine appears with:
- Provisioning type. In this case: Create a virtual machine.
- Virtual machine name: its name
- Folder: the location where this will be displayed in vCenter Server.
- Host: the VMware ESXi host that will run this virtual machine
- Datastore: the datastore of the VMware ESXi hypervisor where it will be stored.
- Guest OS name: name of the guest operating system selected in the wizard and that you want to install in this virtual machine.
- Virtualization Based Security: indicates whether VBS functionality is enabled for this virtual machine or not.
- CPUs: the number of processor cores that will be exposed to the guest operating system
- Memory: amount of RAM allocated to this VM
- NICs: number of virtual network adapters
- NIC x network: name of the virtual network to which virtual network card "x" is connected
- NIC x type: indicates the type of network adapter virtualized by VMware. Note that the type used by default varies depending on the guest operating system previously selected to automatically virtualize a network card natively supported by the desired guest OS.
- SCSI controller x: indicates the type of SCSI controller used
- Create hard disk x: indicates that this is a new virtual disk.
- Capacity: maximum size that this virtual hard disk can use on the host datastore.
- Datastore: datastore in which this virtual hard disk will be stored on the host.
- Virtual device node: specifies which controller slot (in this case, a SCSI controller) this virtual hard drive will be virtually connected to.
- Mode: indicates whether or not this virtual hard disk should be altered when creating or deleting snapshots.
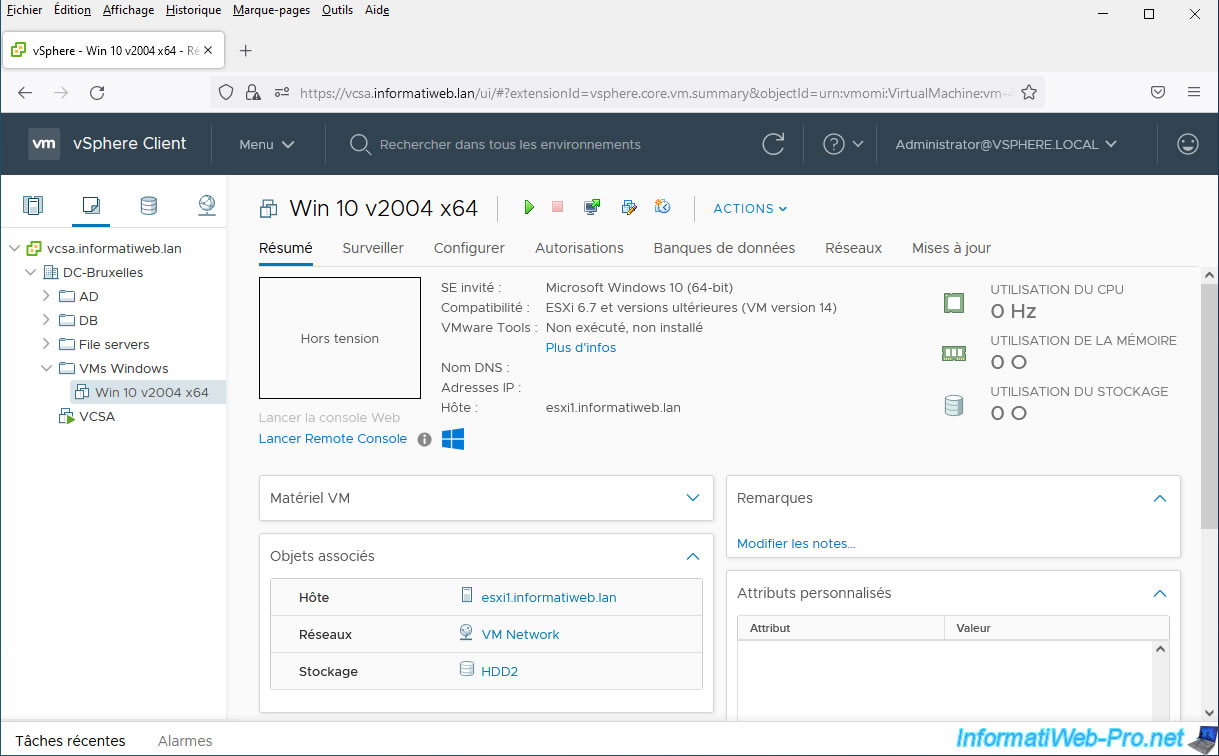
The new created virtual machine appears.
Share this tutorial
To see also
-
VMware 3/13/2024
VMware ESXi 6.7 - Synchronize the clock of ESXi hosts from a time server (NTP)
-
VMware 3/8/2024
VMware ESXi 6.7 - Synchronize the clock of VCSA from a time server (NTP)
-
VMware 7/31/2024
VMware vSphere 6.7 - Add an Active Directory identity source
-
VMware 5/22/2024
VMware vSphere 6.7 - Change default console
You must be logged in to post a comment