- Citrix
- Citrix XenServer
- 25 November 2015 at 12:51 UTC
-

- 1/3


The Citrix XenServer virtualization server allows you to pass a PCI device to a virtual machine using the "PCI passthrough".
This feature is present in the Xen project whose official website is "xenproject.org" and whose the wiki (documentation) is on "wiki.xenproject.org" and "wiki.xen.org".
So, you will find all necessary information on the Wiki of the Xen project.
Warning : although PCI passthrough is possible under Citrix XenServer, you should be aware that this technique is not officially supported by Citrix. This means that if you want help from Citrix (if you paid for support), you will have to revert your unsupported configuration (your PCI passthrough configuration in this case) before contacting them.
- Presentation
- Required configuration
- Configuration used in this tutorial
- PCI passthrough with a Linux virtual machine
- PCI passthrough with a Windows virtual machine
1. Presentation
Why use this feature ?
To use physical devices of the server (USB devices, PCI cards, ...).
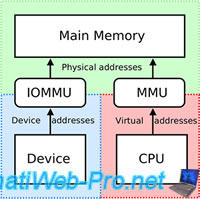
Thus, the machine is isolated from the system (through virtualization of the machine), but she will have direct access to the PCI device. Then, we realize that the virtual machine has direct access to the PCI device and therefore to the server hardware. This poses a security problem because this virtual machine will have a direct memory access (DMA) to it.
Note that for pass a graphics card to a virtual machine, you can't do it by using the PCI passthrough.
Indeed, to pass a graphics card, you should use the VGA passthrough as explained in our tutorial : Citrix XenServer - VGA passthrough
How to correct this DMA vulnerability ?
It's very simple, just enable the IOMMU (or Intel VT-d) option in the motherboard BIOS. This feature allows the motherboard to "remap" access to hardware and memory, to limit access to the device associated to the virtual machine.
Note : In the tutorial, you will see that the physical USB 2.0 controller will have the ID "02: 03.0" and in the virtual machine, this ID will be "00:00.0".
Plain Text
Physical server            Debian VM
02:03.0              <=>   00:00.0
In summary, the virtual machine can use the PCI device, but she will not have access to the rest of the server hardware.
Note : IOMMU (Input-output memory management unit) manage I/O and MMU (memory management unit) manage memory access.
2. Required configuration
IOMMU or VT-d is required to use PCI passthrough ?
Yes and no. But in two cases, it's recommended to enable this feature in the server motherboard BIOS to block DMA (direct memory access) attacks.
- IOMMU is optional but recommended for paravirtualized virtual machines (PV guests)
- IOMMU is required for HVM (Hardware virtual machine) virtual machines. HVM is identical to the "Hardware-assisted virtualization" technology.
- IOMMU is required for the VGA passthrough. To use the VGA passthrough, refer to our tutorial : Citrix XenServer - VGA passthrough
As examples : with XenServer, Debian is paravirtualized (PV guest) and Windows is a HVM virtual machine (HVM guest).
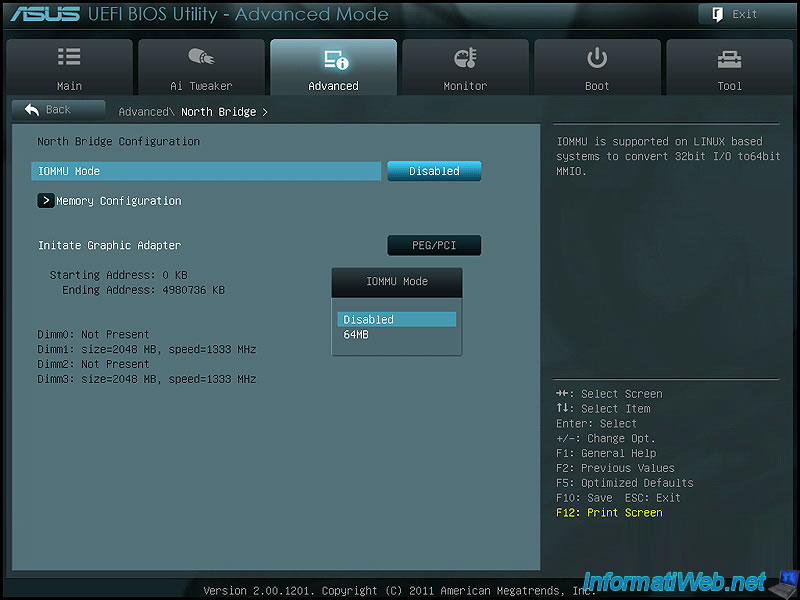
IOMMU or IOMMU Mode (64MB / Disabled) ?
IOMMU corresponds to IOMMU.
While IOMMU mode is used to redirect 32 bits I/O to 64 bits I/O.
If the server and the virtual machine to which you want to pass a PCI device are in 64 bits, IOMMU mode is unnecessary and can be disabled.
Note : IOMMU mode reserve 64MB of RAM if enabled.
Which version of Xen should you use?
As indicated on the Xen wiki, PCI passthrough also requires :
- Xen hypervisor v3.0 or newer. In our case, we use XenServer 6.5.
- Dom0 kernel must have pciback driver (xen-pciback in pvops dom0 kernels)
In the case of a paravirtualized virtual machine (PV guest), the PV domU kernel needs to have the Xen PCI frontend driver loaded for PCI passthrough to work
The complete required configuration is on the Xen wiki.
3. Configuration used in this tutorial
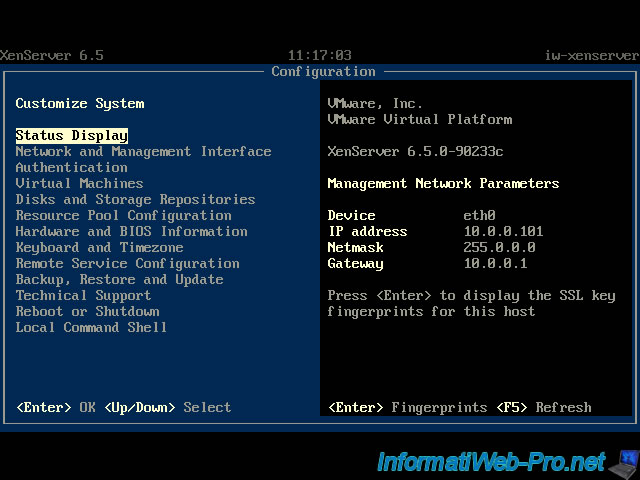
In this tutorial, we will use the virtualization server "XenServer 6.5.0".
Note : updates are not installed, but it's obviously recommended to install them in production.
The "XenCenter 6.5" client.
And a Debian 7.0 virtual machine in 64 Bit (fresh install).

To begin with something simple, we will use PCI passthrough to connect an USB key on a Debian virtual machine.
4. PCI passthrough with a Linux virtual machine
4.1. Compilation of the 3.4.9 linux kernel for Debian x64
As noted earlier, Debian will be paravirtualized (PV guest) by XenServer, so "PCI passthought" requires that Debian supports the driver "Xen PCI frontend driver".
And as shown in the wiki Xen project, some linux kernels are bugged and passthrough with USB Controllers fails.
So, they recommend 3.4.9 and 3.3.8 kernels. And not recommend kernels 3.5 and 3.5.2.
In this tutorial, we will download, compile and install the 3.4.9 Linux kernel as explained on the wiki Xen project (see the link cited above).
To begin, start the Debian virtual machine and log in as root in the virtual machine console.
Create a "src/linux" folder in your home directory.
Bash
mkdir -p ~/src/linux
cd ~/src/linux
Install packages required for the rest of the tutorial.
- wget
- tar
- bzip2
- build-essential
- libncurses-dev
- kernel-package
- fakeroot
Bash
aptitude install wget tar bzip2 build-essential libncurses-dev kernel-package fakeroot
To speed the kernel compilation speed, type this :
Bash
echo "CONCURRENCY_LEVEL=8" >> /etc/kernel-pkg.conf
exit
Log in again as root and type these commands to download, unpack and configure the kernel.
Bash
wget http://www.kernel.org/pub/linux/kernel/v3.0/linux-3.4.9.tar.bz2
tar jxf linux-3.4.9.tar.bz2 && rm linux-3.4.9.tar.bz2
cd linux-3.4.9/
cp /boot/config-3.2.0-4-amd64 .config
make menuconfig
Note : It's possible that the file "config-amd64-3.2.0-4" has a slightly different name because of the version indicated in its name.
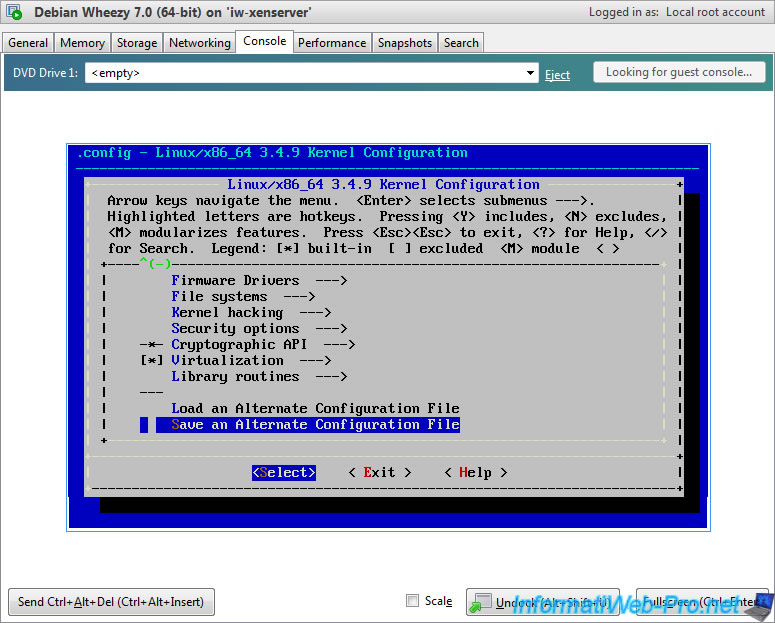
When you type the "make menuconfig" command, some lines will be displayed on the command line then this menu will appear.
In this menu, ensure that these options are enabled :
- Processor type and features -> Paravirtualized guest support -> Xen guest support
- Bus options (PCI etc.) -> Xen PCI Frontend
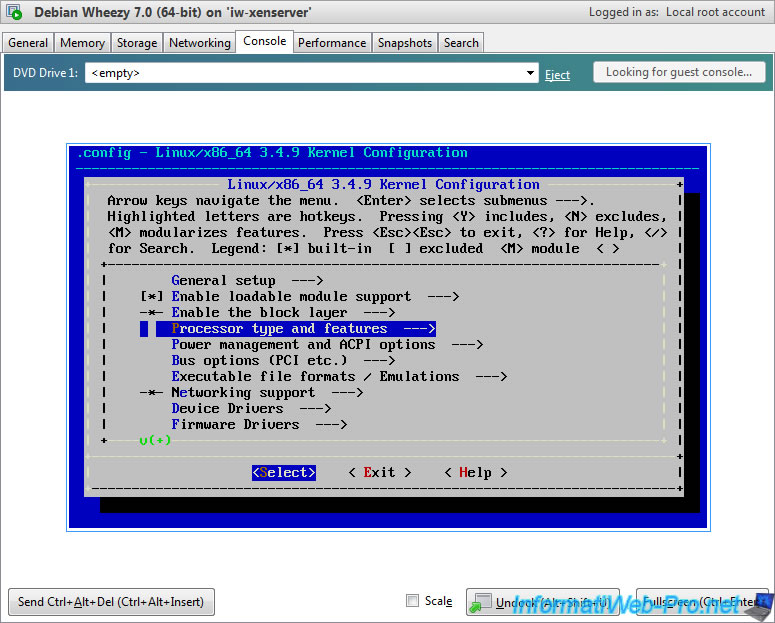
As you can see, "Xen guest support" is build-in by default in the 3.4.9 Linux kernel.
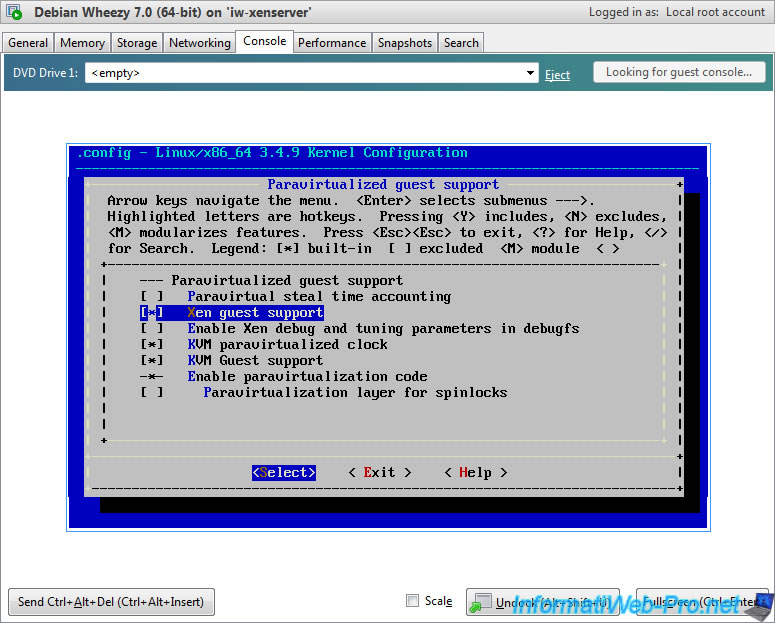
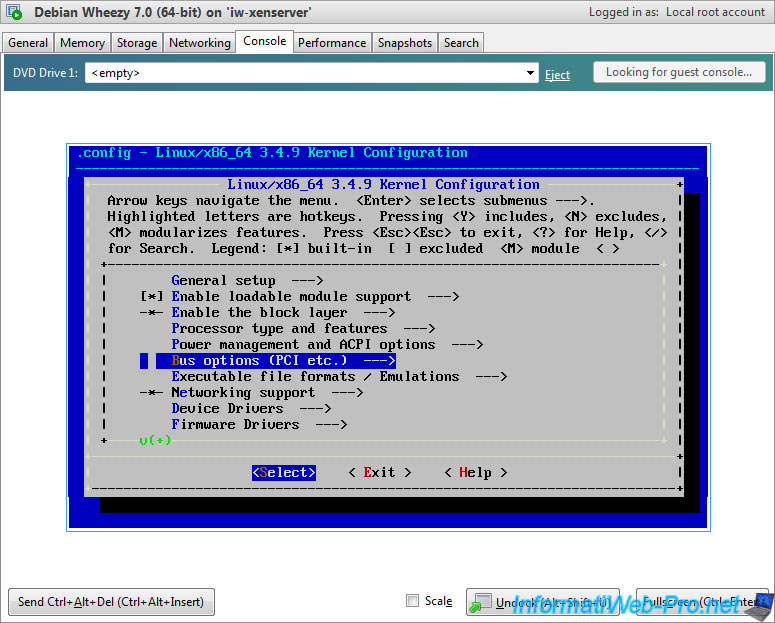
And Xen PCI Frontend is available in module. This isn't a problem.

Return to the main menu by repeatedly pressing the "Esc" key and go on the "Save an Alternate Configuration File" line and press Enter.
Note : it's possible that you have the "<Save>" option at the bottom of the screen. This is the same option.
Leave the default name and press Enter.
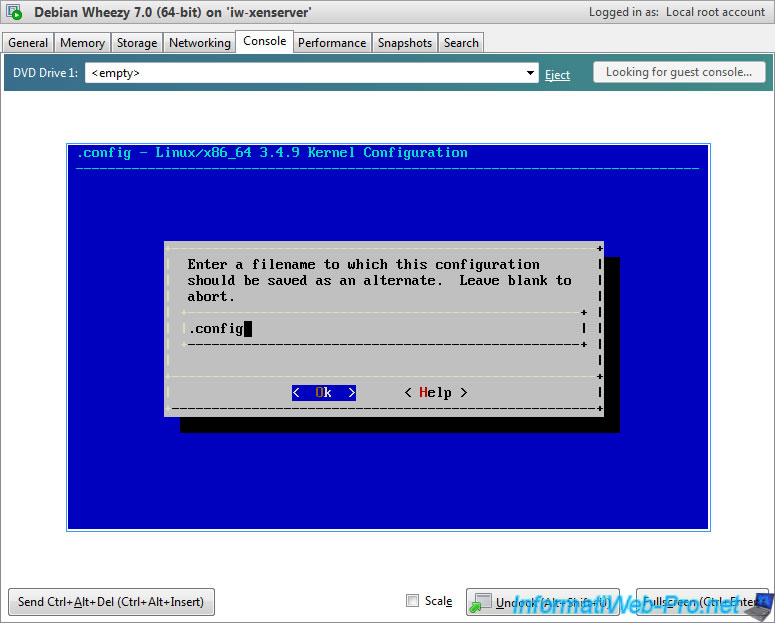
Then, exit the menu by going to <Exit> and pressing Enter.

If you are connected over ssh on the Debian machine (which is not our case), type the command : screen
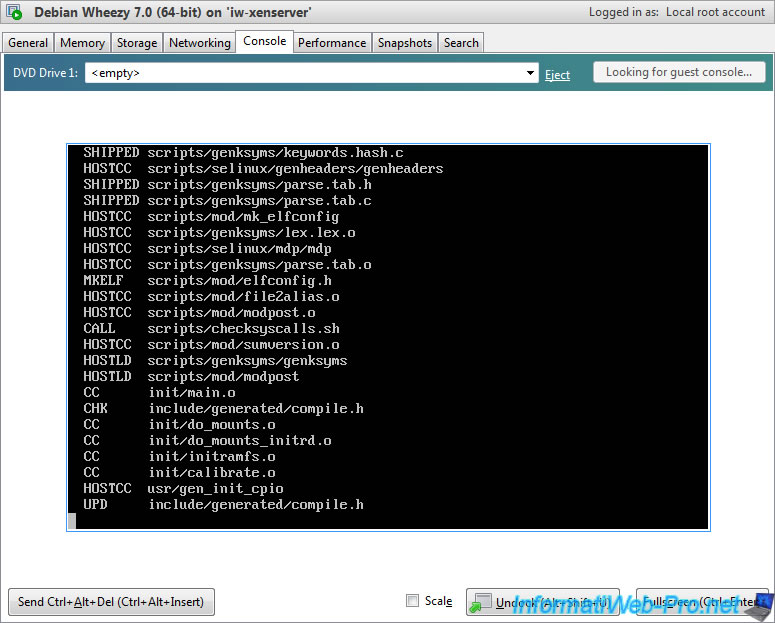
Then, compile the Linux kernel by typing these commands.
Note : It may take more than one hour.
Bash
make-kpkg clean
fakeroot make-kpkg --initrd --revision=3.4.9.custom kernel_image
Once compiled, install it by running the command :
Bash
cd ..
sudo dpkg -i linux-image-3.4.9_3.4.9.custom_amd64.deb
Note : To avoid compiling the kernel the next time, save the file "linux-image-3.4.9_3.4.9.custom_amd64.deb" somewhere.
Once installed, the "update-grub" command will start automatically. So, you will see the "Generating grub.cfg" line.
Finally, reboot Debian by typing this :
Bash
reboot

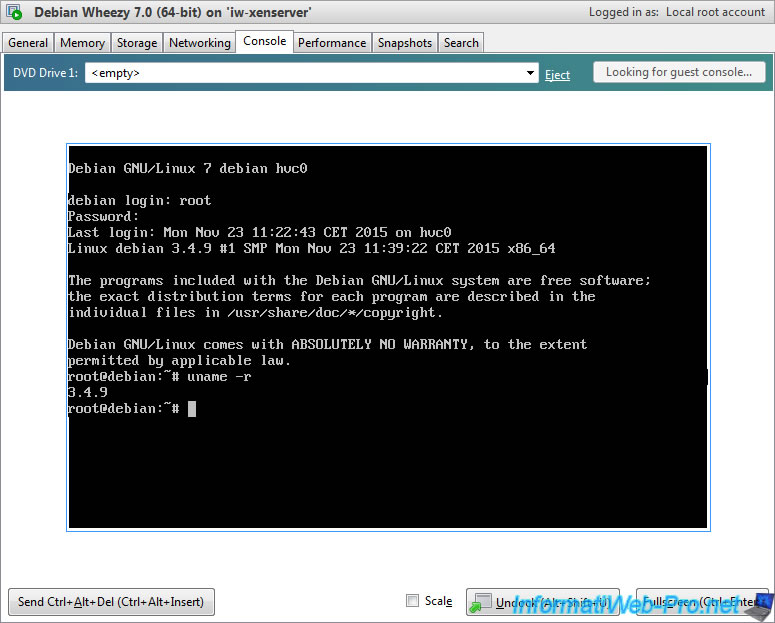
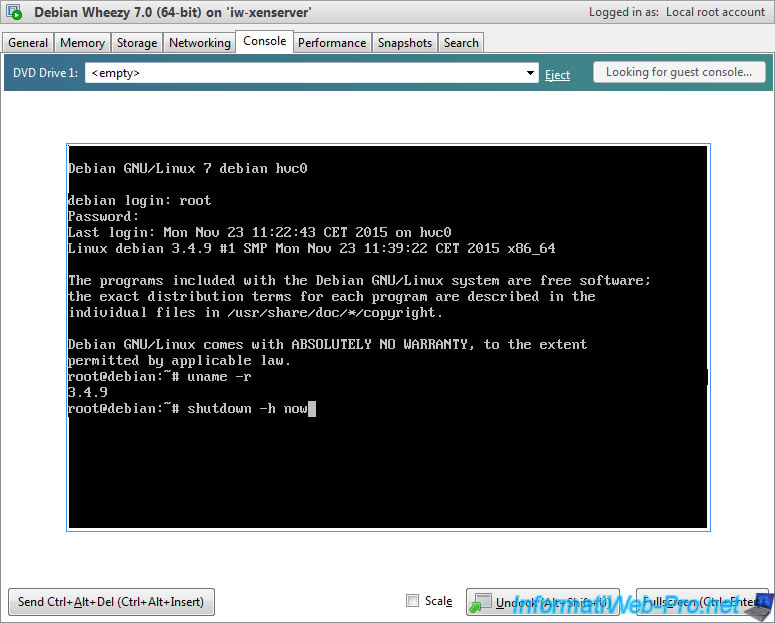
Log in again as root and type this command :
Bash
uname -r
If the kernel is installed correctly, you will see the 3.4.9 version.
For now, shutdown the virtual machine and take a snapshot of it to be able to go back in case of problems.
Bash
shutdown -h now
Share this tutorial
To see also
-
Citrix 12/30/2014
Citrix XenServer 6.2 - Installation, configuration and updates
-
Citrix 5/21/2017
Citrix XenServer 6.5 - Disaster Recovery
-
Citrix 6/13/2017
Citrix XenServer 6.5 - Updating the server
-

Citrix 5/21/2016
Citrix XenServer 6.5 - VGA passthrough
You must be logged in to post a comment