- Linux
- Apache
- 13 February 2014 at 19:47 UTC
-


If you use the Apache web server to a web site e-commerce, customer e-mails, work ... We recommend that you encrypt the connection to such services thanks to the installation of a SSL certificate on your server. To do this, we'll show you how to generate SSL certificates (for free or by paying more professional one) and configure Apache for it to operate through its HTTPS (port 443) protocol.
- Updating the packages list
- Creating keys for the Certificate Signing Request
- Self-signed certificate
- To sign the certificate by a recognized authority
- Securing the Apache web server
- Test configuration
1. Updating the packages list
Before you begin, it is recommended to update the list of available packages in the official repositories of Ubuntu because it will allow you to get the latest version of OpenSSL.
Bash
apt-get update
2. Creating keys for the Certificate Signing Request
To create our private key secure and non-secure, we will use the "openssl" program.
To do this, type the following command to install it (if it is not already).
Bash
apt-get install openssl
Then, create a "ssl" folder in the apache folder.
Bash
mkdir /etc/apache2/ssl
cd /etc/apache2/ssl
Start by creating the private key secure.
Note :
- If you want to sign your certificate by a recognized authority, you may need to choose a value other than 2048 bits.
But now Geotrust demand certificates in 2048 bits.
- In the case of a self-signed certificate, use a larger value as this will enhance the security of the connection. For example : 4096.
Bash
openssl genrsa -des3 -out server.key 2048
Then, create an insecure private key.
Bash
openssl rsa -in server.key -out server.key.insecure
Then, rename the keys obtained.
Bash
mv server.key server.key.secure
mv server.key.insecure server.key
Then, create the certificate request.
Note :
More information you will be required but the most important is the "Common Name (eg, YOUR name or FQDN server)."
Indeed, you will need to enter your domain name or subdomain for which the certificate is valid. If you want your certificate to work on all sub-domains of your domain, simply enter "*.your-domain.com".
Warning : The * character can not be accepted by some authorities or be more expensive than a traditional certificate. However, in the case of a self-signed certificate you can do it without problems.
Bash
openssl req -new -key server.key -out server.csr
Note : Based on the official Ubuntu documentation.
3. Self-signed certificate
Self-signed certificate used to secure the connection of a Web server (for example) for free.
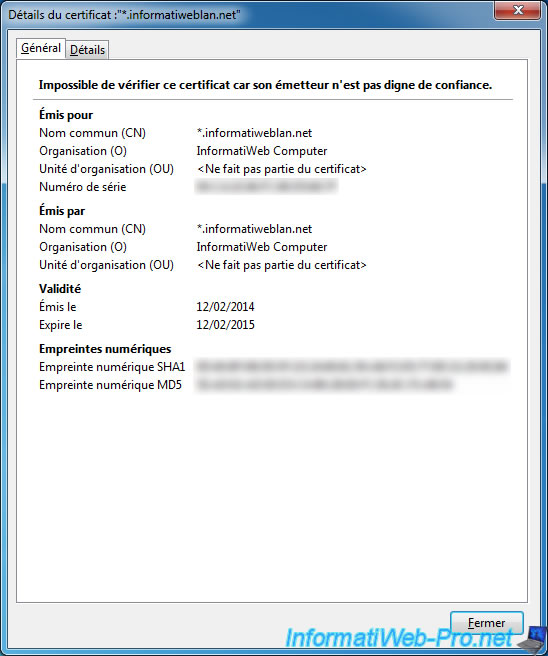
However, a warning is displayed the first time the visitor because the certificate is "self-signed" and that it was therefore not recognized as verified by Symantec SSL, GeoTrust authority ...
If you do not want to have this warning, refer to Section 4 of this tutorial.
To self-sign your certificate, use the following command.
Note : The following command creates a valabble certificate for one year (365-days).
Bash
openssl x509 -req -days 365 -in server.csr -signkey server.key -out server.crt
4. To sign the certificate by a recognized authority
If you don't want a warning is displayed when the visitor tries to access your website. You must be signed by a recognized as Symantec SSL, GeoTrust authority ...
To do this, you will need to send your request to sign your certificate (or Certificate Signing Request : CSR) at the desired authority.
You will then pay the price requested by the authority.
Once payment is made, you will receive your signed certificate (the .crt file) you can then install on your server to secure the connection to your server and without warning to the visitor.
Some known authorities :
- digicert
- GeoTrust
5. Securing the Apache web server
To secure your web server, first enable the Apache "ssl" module.
Bash
a2enmod ssl
Then add the lines "SSLEngine", "SSLCertificateFile" and "SSLCertificateKeyFile" in the virtualhost for the domain pourlequel you create the certificate.
Note : If you only have one site on your server, you can use the "default-ssl" virtualhost present by default in Ubuntu 12.04.
To do this, go to "/etc/apache2/sites-available/" folder and change the "default-ssl" file or the virtualhost to secure by SSL.
Apache
# HTTPS Virtualhost (port 443)
<VirtualHost *:443>
   ServerName informatiweblan.net
   ServerAlias www.informatiweblan.net
   DocumentRoot /var/www/informatiweblan.net

   SSLEngine on
   SSLCertificateFile /etc/apache2/ssl/server.crt
   SSLCertificateKeyFile /etc/apache2/ssl/server.key
</VirtualHost>
Then change the "default" file, if you want to redirect all visitors to the secure SSL domain :
Apache
# Redirect HTTP to HTTPS domain to the
# This will prevent access to the unsecured version of your site.
<VirtualHost *:80>
   ServerName informatiweblan.net
   ServerAlias www.informatiweblan.net
   Redirect / https://informatiweblan.net/
</VirtualHost>
And finally, select the "default-ssl" and restart the Apache web server to reflect the changes site.
Bash
a2ensite default-ssl
service apache2 restart
Note : Based on the official Ubuntu-fr documentation.
6. Test configuration
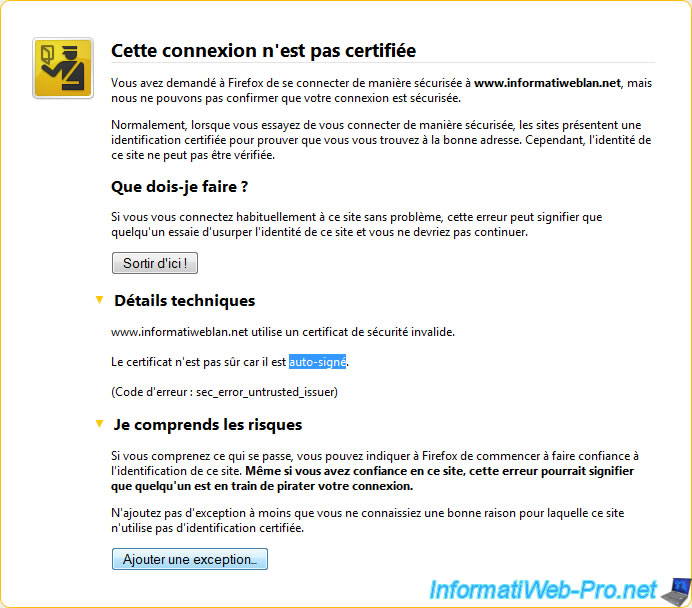
To test the configuration of your server, go to your web site by HTTPS (port : 433) "https://www.informatiweblan.net/".
Then, if you use a self-signed certificate (free), you will receive the warning "This connection is not certified."
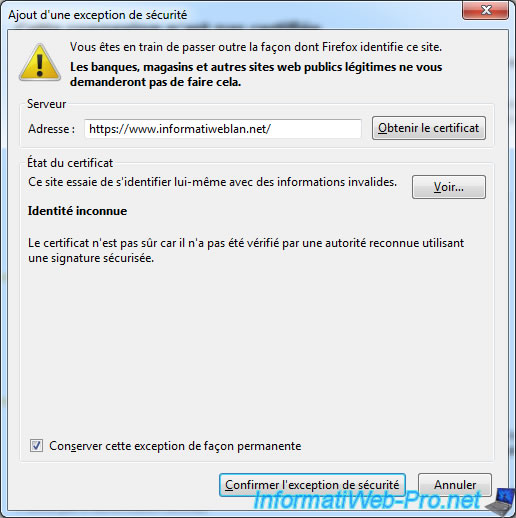
That this warning is no longer displayed, you (and others) need to click the button "Add exception". Then "Confirm Security Exception" in the window that opens.
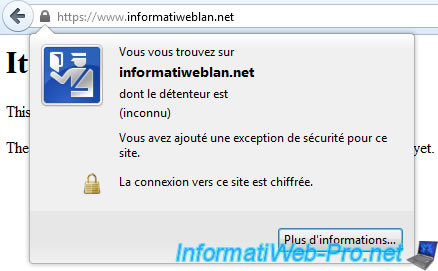
And finally, you can access your website securely.
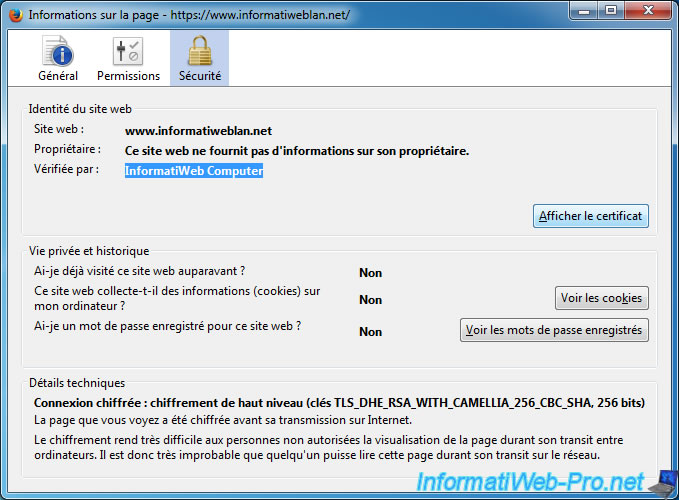
You can see the expiry dates by clicking on "View Certificate".
Share this tutorial
To see also
-
Linux 9/8/2016
StartSSL - Renew your SSL certificates
-
Linux 7/24/2015
StartSSL - Secure your website for free
-

Linux 1/31/2014
Ubuntu - Install a complete web server
You must be logged in to post a comment