- Linux
- 17 June 2015 at 11:23 UTC
-


If you arrive on this page, is that you have already received a DDoS attack on your server or you want to protect it before this attack happens on your server.
In this tutorial, we will install "No More DDOS" (replacing DDoS Deflate that is no longer maintained by its author) that lets you easily protect you against small DDoS attacks.
This script is available in 2 versions :
- the Debian version, compatible with : Debian 6/7/8, Ubuntu Server 13.10, Ubuntu Server 14.04, Linux Mint 17 and distributions based on Debian.
- the CentOs version, compatible with : CentOs 6/7, RHEL 6/7 (à venir dans la version 2.0), Fedora 20 (coming in version 2.0), and distributions based on CentOs.
- Install No More DDOS
- Configurer No More DDOS
- No More DDOS GUI
- Update No More DDOS
- Désinstaller No More DDOS
1. Install No More DDOS
To install "No More DDOS for Debian", use the following command :
Bash
wget -O- https://raw.githubusercontent.com/stylersnico/nmd/master/debian/install.sh | sh
To install"No More DDOS for CentOS 7" use the following command :
Bash
wget -O- https://raw.githubusercontent.com/stylersnico/nmd/master/centos/install.sh | sh
2. Configurer No More DDOS
To configure No More DDOS, edit the "/usr/local/nmd/conf.d/agent.conf" file :
Bash
vim /usr/local/nmd/conf.d/agent.conf
In this file, you can edit the following information :
- FREQ : Interval time between 2 launches of the script. By default, this script is run once per minute.
- NO_OF_CONNECTIONS : Corresponds to the maximum number of established connections to an IP address. If an IP address has more than 500 connections established on your server, this IP will be banned.
- APF_BAN : By default, the script blocks IP addresses in the firewall with iptables (APF_BAN=0). To use "APF", specify 1 (APF_BAN=1).
- EMAIL_TO : If you wish to be notified when blocking a DDoS attack, enter your email address at this line. If you leave this empty, then, no e-mail will be sent.
- BAN_PERIOD : Period during an IP address is blocked. Default : 3600 seconds = 1 hour.
3. No More DDOS GUI
No More DDOS provides a "graphical interface" in order to :
- Test the No More DDOS agent
- Add an IP address to the white list (for example : the IP address of a monitoring server as Nagios or other)
- List IP addresses currently blocked
- Unblock an IP address.
- Ban an IP address
- Clear the agent history
- Restore the Cron job
- Restore the original configuration
Note : This GUI works only with bans made in iptables.
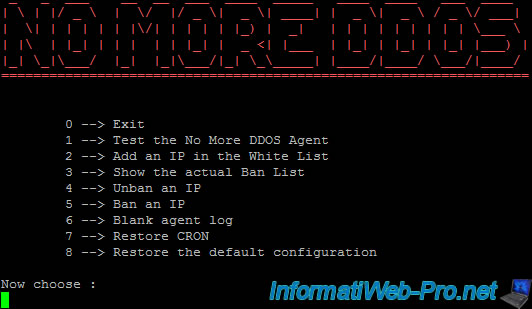
To use this GUI, type the following command :
Bash
/usr/local/nmd/nmd
To save changes made in the configuration file, use the 7 option and then the option 1.
Option 7 :
Plain Text
--> Creating new cron

[....] Restarting periodic command scheduler: cron[ ok ] Stopping periodic command scheduler: cron.
[ ok ] Starting periodic command scheduler: cron.
[....] Restarting periodic command scheduler: cron[ ok ] Stopping periodic command scheduler: cron.
[ ok ] Starting periodic command scheduler: cron.

--> Done
Option 1 :
Note : The number in front of the IP address is the number of currently established connections from this IP address.
Plain Text
friday 5 june 2015, xx:xx:xx (UTC+0000)
Connections | IP

      2 xx.xx.xx.xx
To ban an IP address or add an IP address to the white list, simply select the corresponding option and indicate the desired IP address.
4. Update No More DDOS
Pour mettre à jour "No More DDOS for Debian" utilisez la commande suivante :
Bash
wget -O- https://raw.githubusercontent.com/stylersnico/nmd/master/debian/update.sh | sh
Pour mettre à jour "No More DDOS for CentOS 7" utilisez la commande suivante :
Bash
wget -O- https://raw.githubusercontent.com/stylersnico/nmd/master/centos/update.sh | sh
5. Désinstaller No More DDOS
Pour désinstaller "No More DDOS for Debian" utilisez la commande suivante :
Bash
wget -O- https://raw.githubusercontent.com/stylersnico/nmd/master/debian/uninstall.sh | sh
Pour désinstaller "No More DDOS for CentOS 7" utilisez la commande suivante :
Bash
wget -O- https://raw.githubusercontent.com/stylersnico/nmd/master/centos/uninstall.sh | sh
Share this tutorial
To see also
-

Linux 12/20/2014
Debian / Ubuntu - Monitor your server with Monit
-
Linux 7/24/2015
StartSSL - Secure your website for free
-

Linux 1/15/2014
Ubuntu - Configure a LDAP server and a web interface to manage it
-
Linux 1/11/2014
Ubuntu - Install and secure a SSH server
You must be logged in to post a comment